|
你是否将未加密的密码、机密和任何其它不需要的数据类型存储在你的git源代码存储库中?Gitleaks为你提供了一种方法来扫描你的git存储库,以查找这些不需要的数据,这些数据应该是私有的,扫描可以自动化,以完全适合CI/CD工作流程,以便在密码识别更深入到代码库之前进行识别。
Gitleaks特色 Gitleaks的一些很酷的功能包括: 支持私有存储库扫描以及需要基于密钥的身份验证的存储库。 支持Gitlab批量组织和存储库所有者(用户)存储库扫描,并提取请求扫描以在常见CI工作流中使用。 可以输出JSON和CSV格式的扫描结果以及其他报告工具和框架中的消费格式。 用于特定于环境的自定义的外部化配置,包括正则表达式规则。 可自定义的存储库名称,文件类型,提交ID,分支机构和正则表达式白名单,以减少误报。 通过使用src-d的go-git框架实现高性能。
下载链接
安装Gitleaks的方法 Gitleaks是用Go编写的(参考:在RHEL 8系统中安装Go的方法),二进制文件可用于许多流行的平台和操作系统类型。 1、下载Gitleaks 对于Linux用户: wget https://github.com/zricethezav/gitleaks/releases/download/v$VER/gitleaks-linux-amd64 对于macOS用户: wget https://github.com/zricethezav/gitleaks/releases/download/v$VER/gitleaks-darwin-amd64 如果你是Windows用户,请下载并安装gitleaks-windows-amd64.exe程序包。 2、安装Gitleaks 下载文件后,将其放在/usr/local/bin目录中: mv gitleaks-linux-amd64 gitleaks chmod +x gitleaks sudo mv gitleaks /usr/local/bin/ 对于macOS: mv gitleaks-darwin-amd64 /usr/local/bin/gitleaks 确认可以调用gitleaks命令: $ gitleaks --version 1.24.0
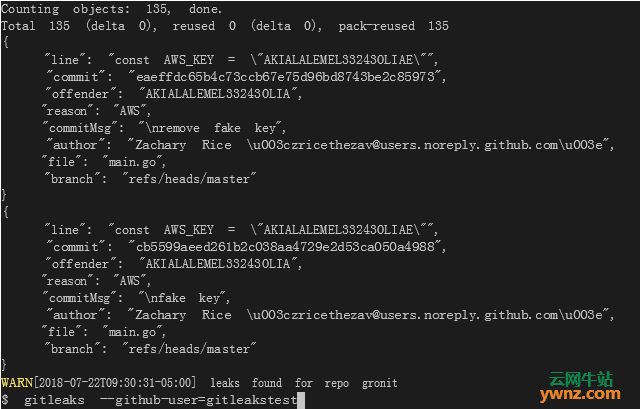
使用Gitleaks审计Git存储库 Gitleaks有许多你基本不需要的可调参数,默认模式应该针对单个仓库而不进行任何调整: $ gitleaks --repo=https://github.com/jmutai/dotfiles INFO[2019-02-13T15:55:43+03:00] cloning https://github.com/jmutai/dotfiles Enumerating objects: 42, done. Counting objects: 100% (42/42), done. Compressing objects: 100% (34/34), done. Total 2255 (delta 10), reused 26 (delta 8), pack-reused 2213 INFO[2019-02-13T15:55:57+03:00] 0 leaks detected. 159 commits inspected in 13 seconds 389 milliseconds 要在gitleaks处理存储库时查看审计输出,请使用-v或--verbose标志打开详细模式: $ gitleaks --repo=https://github.com/gitleakstest/gronit -v INFO[2019-02-13T16:06:08+03:00] cloning https://github.com/gitleakstest/gronit Enumerating objects: 135, done. Total 135 (delta 0), reused 0 (delta 0), pack-reused 135 { "line": "const AWS_KEY = \"AKIALALEMEL33243OLIAE\"", "commit": "eaeffdc65b4c73ccb67e75d96bd8743be2c85973", "offender": "AKIALALEMEL33243OLIA", "reason": "AWS", "commitMsg": "remove fake key", "author": "Zachary Rice \u003czricethezav@users.noreply.github.com\u003e", "file": "main.go", "repo": "gronit", "date": "2018-02-04T19:43:28-06:00" } { "line": "const AWS_KEY = \"AKIALALEMEL33243OLIAE\"", "commit": "cb5599aeed261b2c038aa4729e2d53ca050a4988", "offender": "AKIALALEMEL33243OLIA", "reason": "AWS", "commitMsg": "fake key", "author": "Zachary Rice \u003czricethezav@users.noreply.github.com\u003e", "file": "main.go", "repo": "gronit", "date": "2018-02-04T19:10:58-06:00" } WARN[2019-02-13T16:06:11+03:00] 2 leaks detected. 33 commits inspected in 2 seconds 598 milliseconds 要启用线程,请使用--threads选项: CPU=$(cat /proc/cpuinfo | grep -ic ^processor) gitleaks --repo=https://github.com/jmutai/dotfiles --threads=$CPU 此选项指定生成的最大线程数。
在Redact模式下运行Gitleaks --redact将帮助显示包含秘密的行而不记录内容: $ gitleaks --repo=https://github.com/gitleakstest/gronit --redact INFO[2019-02-13T16:10:16+03:00] cloning https://github.com/gitleakstest/gronit Enumerating objects: 135, done. Total 135 (delta 0), reused 0 (delta 0), pack-reused 135 WARN[2019-02-13T16:10:20+03:00] 2 leaks detected. 33 commits inspected in 3 seconds 786 milliseconds
将Gitleaks审计结果保存到文件中 你还可以对一堆存储库运行审计,并为文件中的每个存储库保存报表,为此,请使用--report选项: $ gitleaks --repo=https://github.com/jmutai/dotfiles --report=gitleaks_results.csv INFO[2019-02-13T16:13:57+03:00] cloning https://github.com/jmutai/dotfiles Enumerating objects: 42, done. Counting objects: 100% (42/42), done. Compressing objects: 100% (34/34), done. Total 2255 (delta 10), reused 26 (delta 8), pack-reused 2213 INFO[2019-02-13T16:14:15+03:00] 0 leaks detected. 159 commits inspected in 17 seconds 685 milliseconds 注:报告必须以.csv或.json结尾。
相关主题 |