|
我们来了解一下 Nginx Unit 有些什么特性及 Nginx Unit 在各大Linux平台上的安装方法。
什么是 Nginx Unit Nginx Unit 是一个开源的、以 Nginx 为基础的、支持多语言的动态 Web 应用服务器,它支持 Python、PHP、Perl、Ruby 和 Go 等多种语言应用程序,可以在不中断服务的情况下完成部署配置更改,并以多种语言运行代码。 Nginx Unit 是一个新的开源项目,由 Igor Sysoev 发起,他说:”我想着手开发一款应用服务器,它能够远程动态配置,并且能够从一种语言的应用程序版本动态切换到另一种语言的应用程序。” Igor 认为动态配置和交换无疑是主要问题,人们希望在不中断客户端处理的情况下重新配置服务器。 Nginx Unit 使用 REST API 进行动态配置,它没有静态配置文件。所有配置更改直接在内存中发生,配置更改无需重新加载或服务中断即可生效。
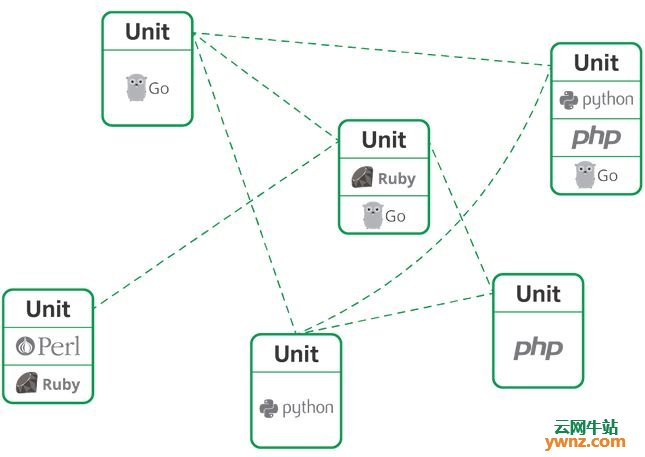
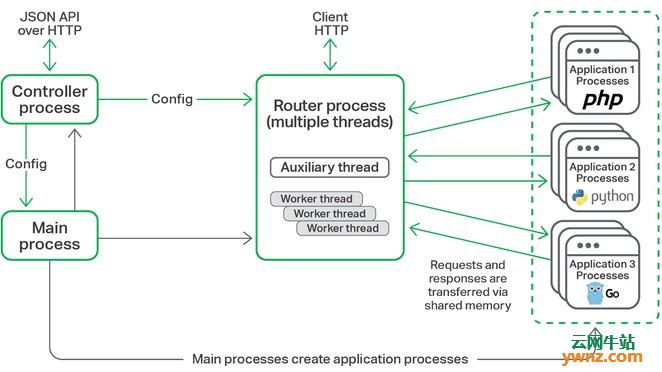
1.Nginx Unit 还支持多语言版本,比如用户可以在同一台服务器上同时运行 PHP 5 和 PHP 7 编写的应用程序。未来的 Nginx Unit 版本计划支持包括 Java 在内的其他语言。 2.Nginx Unit 可以根据需要启动和扩展应用程序的进程,并在自己的安全沙箱中执行每一个应用程序实例。 3.Nginx Unit 通过一个单独的 “路由器” 进程管理和路由所有传入网络通信到应用程序,因此它可以在不中断服务的情况下快速实施配置的更改。 4.Nginx Unit 的配置采用了 JSON 格式,因此用户可以手动编辑,而且非常适合脚本编写。 5.Nginx Unit 支持多种语言运行时的能力是基于它内部的路由器进程之间的隔离,路由器进程可终止传入的 HTTP 请求,以及应用程序进程的分组,它实现了应用程序运行时并执行应用程序代码。
路由器进程是持久的,它从不重新启动,意味着配置更新可以无缝地实现,而不会中断服务。每一个应用程序进程都部署在自己的沙箱中(在开发中支持 Linux 控制组 cgroups ),以便 Nginx Unit 为用户代码提供安全的隔离。
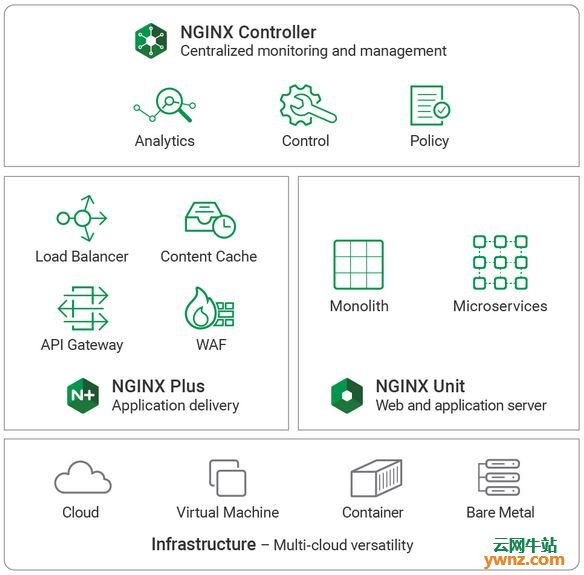
Nginx Unit 和 Nginx 应用平台 Nginx Unit 平台通常会提供 Nginx 开源的前端层或 Nginx Plus 反向代理,以提供入口控制,边缘负载均衡和安全性。然后可以使用 Nginx 控制器对联合平台(Nginx Unit 和 Nginx 或 Nginx Plus)进行全面管理,以监控、配置和控制整个平台。
这三个组件:Nginx Plus,Nginx Unit 和 Nginx Controller 组成了 Nginx 应用平台。Nginx 应用平台是一个产品套件,提供负载均衡、缓存、API管理、WAF和应用服务,并具有丰富的管理和控制面板,可简化单片应用、微服务和过渡应用的操作任务。
其它相关 如果你需要了解更多一些关于 Nginx Unit 的信息,可直接访问其官网网站。
Nginx Unit 的安装 Nginx Unit 的安装部署也是非常简单的,官方文档也对如何在几大流行的 Linux 发行版本上进行部署做了详细讲解,下面就是官方提供的安装方法。 1.System Requirements NGINX Unit is tested to compile and run on the following systems: -Linux 2.6 or later -FreeBSD 9 or later -MacOS X -Solaris 11 Architectures: -i386 -amd64 -powerpc -arm For applications running in NGINX Unit you need the respective programming languages: -Python 2.6, 2.7, 3 -PHP 5, 7 -Go 1.6 or later -Perl 5.12 or later -Ruby 2.0 or later You can run multiple versions of the same language installed on the same system. 2.Precompiled Packages Precompiled binaries for Unit are available for: -CentOS 6,7 -RHEL 6,7 -Amazon Linux -Ubuntu 16.04,17.10,18.04 -Debian 8,9 3.CentOS Packages 1]Create the file /etc/yum.repos.d/unit.repo with the following contents: [unit] name=unit repo baseurl=https://packages.nginx.org/unit/centos/$releasever/$basearch/ gpgcheck=0 enabled=1 2]Install Unit base package: # yum install unit 3]Install additional module packages you would like to use, e.g.: # yum install unit-php unit-python unit-go unit-perl 4.RHEL Packages 1]Create the file /etc/yum.repos.d/unit.repo with the following contents: [unit] name=unit repo baseurl=https://packages.nginx.org/unit/rhel/$releasever/$basearch/ gpgcheck=0 enabled=1 2]Install Unit base package: # yum install unit 3]Install additional module packages you would like to use. For RHEL 6: # yum install unit-php unit-python unit-perl For RHEL 7: # yum install unit-php unit-python unit-go unit-perl 5.Amazon Linux Packages 1]Create the file /etc/yum.repos.d/unit.repo with the following contents: [unit] name=unit repo baseurl=https://packages.nginx.org/unit/amzn/$releasever/$basearch/ gpgcheck=0 enabled=1 2]For Amazon Linux 2 LTS: [unit] name=unit repo baseurl=https://packages.nginx.org/unit/amzn2/$releasever/$basearch/ gpgcheck=0 enabled=1 3]Install Unit base package: # yum install unit 4]Install additional module packages you would like to use, e.g.: # yum install unit-php unit-python27 unit-python34 unit-python35 unit-python36 unit-go unit-perl 5]For Amazon Linux 2 LTS: # yum install unit-php unit-python unit-go unit-perl 6.Ubuntu Packages 1]Download the key(https://nginx.org/keys/nginx_signing.key) used to sign the NGINX, Inc. repository and packages. 2]Add the key to the apt program’s keyring: # apt-key add nginx_signing.key The program can then authenticate the NGINX repository signature, which eliminates warnings about a missing PGP key during installation of the Unit package. 3]Create the /etc/apt/sources.list.d/unit.list file with the following contents. For Ubuntu 16.04: deb https://packages.nginx.org/unit/ubuntu/ xenial unit deb-src https://packages.nginx.org/unit/ubuntu/ xenial unit For Ubuntu 17.10: deb https://packages.nginx.org/unit/ubuntu/ artful unit deb-src https://packages.nginx.org/unit/ubuntu/ artful unit For Ubuntu 18.04: deb https://packages.nginx.org/unit/ubuntu/ bionic unit deb-src https://packages.nginx.org/unit/ubuntu/ bionic unit 4]Install Unit base package: # apt-get update # apt-get install unit 5]Install additional module packages you would like to use. For Ubuntu 16.04: # apt-get install unit-php unit-python2.7 unit-python3.5 unit-go unit-perl unit-ruby For Ubuntu 17.10: # apt-get install unit-php unit-python2.7 unit-python3.6 unit-go1.8 unit-go1.9 unit-perl unit-ruby For Ubuntu 18.04: # apt-get install unit-php unit-python2.7 unit-python3.6 unit-go1.9 unit-go1.10 unit-perl unit-ruby 7.Debian Packages 1]Download the key(https://nginx.org/keys/nginx_signing.key) used to sign the NGINX, Inc. repository and packages. 2]Add the key to the apt program’s keyring: # apt-key add nginx_signing.key The program can then authenticate the NGINX repository signature, which eliminates warnings about a missing PGP key during installation of the Unit package. 3]Create the /etc/apt/sources.list.d/unit.list file with the following contents. For Debian 8: deb https://packages.nginx.org/unit/debian/ jessie unit deb-src https://packages.nginx.org/unit/debian/ jessie unit For Debian 9: deb https://packages.nginx.org/unit/debian/ stretch unit deb-src https://packages.nginx.org/unit/debian/ stretch unit 4]Install Unit base package: # apt-get update # apt-get install unit 5]Install additional module packages you would like to use. For Debian 8: # apt-get install unit-php unit-python2.7 unit-python3.4 unit-perl unit-ruby For Debian 9: # apt-get install unit-php unit-python2.7 unit-python3.5 unit-go1.7 unit-go1.8 unit-perl unit-ruby 8.Source Code This section explains how to compile and install Unit from the source code. 9.Getting Sources There are three ways to obtain the Unit source code: from the NGINX, Inc. Mercurial repository, from GitHub, or in a tarball. In each case, the sources are placed in the unit subdirectory of the current working directory. 10.Mercurial Repository 1]If you don’t already have the Mercurial software, download and install it. For example, on Ubuntu systems, run this command: # apt-get install mercurial 2]Download the Unit sources: # hg clone https://hg.nginx.org/unit 11.GitHub Repository 1]If you don’t already have the Git software, download it. See the GitHub documentation.(https://help.github.com/) 2]Download the Unit sources: # git clone https://github.com/nginx/unit 11.Tarball Unit source code tarballs are available at https://unit.nginx.org/download/. 12.Installing Required Software Before configuring and compiling Unit, you must install the required build tools plus the library files for each of the available languages (Go, PHP, and Python) that you want to support. 13.Ubuntu Prerequisites 1]Install the build tools: # apt-get install build-essential 2]For Go applications support, install the golang package: # apt-get install golang 3]For PHP applications support, install the php-dev and libphp-embed packages: # apt-get install php-dev # apt-get install libphp-embed 4]For Python applications support, install the python-dev package: # apt-get install python-dev 5]For Perl applications support, install the libperl-dev package: # apt-get install libperl-dev 6]For Ruby applications support, install the ruby-dev package: # apt-get install ruby-dev 14.CentOS Prerequisites 1]Install the build tools: # yum install gcc make 2]For Go applications support, install the golang package: # yum install golang 3]For PHP applications support, install the php-devel and php-embedded packages: # yum install php-devel php-embedded 4]For Python applications support, install the python-devel package: # yum install python-devel 5]For Perl applications support, install the perl-devel and perl-libs packages: # yum install perl-devel perl-libs 6]For Ruby applications support, install the ruby-devel package: # yum install ruby-devel 15.Configuring Sources First you need to run configure script to perform necessary system checks and generate Makefile required to compile all other stuff: # ./configure With Unit, you can simultaneously run applications that use different versions of a supported language (Go, PHP, or Python). You need to configure a separate Unit module for each one. The following commands create the necessary instructions in the Makefile for each module. 16.Configuring Go Package NGINX Unit will provide the Go package that is required for running your Go application inside Unit. 1]Set the GOPATH environment variable, which sets the output directory for the Unit Go package: # export GOPATH=/home/user/go_apps 2]Run the following command: # ./configure go configuring Go package checking for Go ... found + go version go1.6.2 linux/amd64 + Go package path: "/home/user/go_apps" 3]Install the Go package in your working GOPATH: # make go-install 16.Building the Go Applications 1]Modify the source file for the Go application, making changes in two places: a.In the import section, add "nginx/unit" on a separate line: import ( "fmt" "net/http" "nginx/unit" ) b.In the main() function, comment out the http.ListenandServe function and insert the unit.ListenAndServe function: func main() { http.HandleFunc("/", handler) //http.ListenAndServe(":8080", nil) unit.ListenAndServe(":8080", nil) } 2]Build the Go application: # go build If the Go application is executed directly, the unit module will fall back to the http module. If the Go application is launched by Unit, it will communicate with the Unit router via shared memory. 17.Configuring Perl Modules To configure a Unit module (called perl.unit.so) for the version of Perl that the configure script finds bundled with the operating system, run this command: # ./configure perl To configure Unit modules for other versions of Perl (including versions you have customized), repeat the following command for each one: # ./configure perl OPTIONS where OPTIONS can be: --module=<prefix> Sets the filename prefix for the Unit module specific to the Perl version (that is, the resulting module is called <prefix>.unit.so). --perl=<perl> Specifies the particular Perl interpreter. --include=<directory> Specifies the directory for the Perl headers files to use. For example, this command generates a module called perl-5.20.unit.so for Perl 5.20.2: $ ./configure perl --module=perl-5.20 \ --perl=perl5.20.2 configuring Perl module checking for Perl ... found + Perl version: 5.20.2 + Perl module: perl-5.20.unit.so 18.Configuring PHP Modules To configure a Unit module (called php.unit.so) for the version of PHP that the configure script finds bundled with the operating system, run this command: # ./configure php To configure Unit modules for other versions of PHP (including versions you have customized), repeat the following command for each one: # ./configure php OPTIONS where OPTIONS can be: --module=<prefix> Sets the filename prefix for the Unit module specific to the PHP version (that is, the resulting module is called <prefix>.unit.so). --config=<script> Specifies the php-config script for the particular version of PHP. --lib-path=<directory> Specifies the directory for the PHP library file to use. --lib-static Enables linking with static library. For example, this command generates a module called php70.unit.so for PHP 7.0: # ./configure php --module=php70 \ --config=/usr/lib64/php7.0/bin/php-config \ --lib-path=/usr/lib64/php7.0/lib64 configuring PHP module checking for PHP ... found + PHP version: 7.0.22-0ubuntu0.16.04.1 + PHP SAPI: [apache2handler embed cgi cli fpm] checking for PHP embed SAPI ... found + PHP module: php70.unit.so 19.Configuring Python Modules To configure a Unit module (called python.unit.so) for the version of Python that the configure script finds bundled with the operating system, run this command: # ./configure python To configure Unit modules for other versions of Python (including versions you have customized), repeat the following command for each one: # ./configure python OPTIONS where OPTIONS can be: --module=<prefix> Sets the filename prefix for the Unit module specific to the Python version (that is, the resulting module is called <prefix>.unit.so). --config=<script> Specifies the python-config script for the particular version of Python. --lib-path=<directory> Specifies the directory for the Python library file to use. For example, this command generates a module called py33.unit.so for Python 3.3: # ./configure python --module=py33 \ --config=python-config-3.3 configuring Python module checking for Python ... found checking for Python version ... 3.3 + Python module: py33.unit.so 20.Configuring Ruby Modules To configure a Unit module (called ruby.unit.so) for the version of Ruby that the configure script finds bundled with the operating system, run this command: # ./configure ruby To configure Unit modules for other versions of Ruby (including versions you have customized), repeat the following command for each one: # ./configure ruby OPTIONS where OPTIONS can be: --module=<prefix> Sets the filename prefix for the Unit module specific to the Ruby version (that is, the resulting module is called <prefix>.unit.so). --ruby=<ruby> Specifies the particular Ruby interpreter. For example, this command generates a module called ru23.unit.so for Ruby 2.3: # ./configure ruby --module=ru23 \ --ruby=ruby23 configuring Ruby module checking for Ruby ... found + Ruby version: 2.3.0 + Ruby module: ru23.unit.so 21.Compiling Sources To compile the Unit executable and all configured modules run this command: # make all 22.Installing from Sources To install Unit with all modules and Go packages, run the following command: # make install
相关主题 |