|
DNSmasq是一个小巧且方便地用于配置DNS和DHCP的工具,适用于小型网络。本文将使用Dnsmasq部署DHCP服务。DNSmasq提供了DNS功能和可选择的DHCP功能可以取代dhcpd(DHCPD服务配置)和Bind等服务。DNSmasq配置起来更简单,更适用于虚拟化和大数据环境的部署。 DNSmasq所提供的DHCP服务也是和dhcpd十分相近的。如同共动态地址分配,可以通过MAC地址预先指定静态的IP地址给特定的主机等等。
使用DNSmasq提供DHCP服务也是相当简单的事情。配置文件/etc/dnsmasq.conf中的注释已经给出了非常详细的解释,其中一些关键的配置如下。 运行:$ cat /etc/dnsmasq.conf
# 服务监听的网络接口地址 # If you want dnsmasq to listen for DHCP and DNS requests only on # specified interfaces (and the loopback) give the name of the # interface (eg eth0) here. # Repeat the line for more than one interface. #interface= # Or you can specify which interface _not_ to listen on #except-interface= # Or which to listen on by address (remember to include 127.0.0.1 if # you use this.) listen-address=192.168.1.132,127.0.0.1 # dhcp动态分配的地址范围,自动分配50-150ip段,有效期48小时 # Uncomment this to enable the integrated DHCP server, you need # to supply the range of addresses available for lease and optionally a lease time dhcp-range=192.168.1.50,192.168.1.150,48h # dhcp服务的静态绑定 # dhcp-host的配置方式有很多种,这里使用的是:[client端MAC地址] + [分配的IP]+ [主机名] # Always set the name and ipaddr of the host with hardware address # dhcp-host=00:0C:29:5E:F2:6F,192.168.1.201 # dhcp-host=00:0C:29:5E:F2:6F,192.168.1.201,infinite 无限租期 dhcp-host=00:0C:29:5E:F2:6F,192.168.1.201,os02 dhcp-host=00:0C:29:15:63:CF,192.168.1.202,os03 # dhcp服务的其它几种绑定方式 # Always allocate the host with ethernet address 11:22:33:44:55:66 # The IP address 192.168.0.60 # 绑定网卡地址对应ip地址,用的是host的方式,类似在hosts文件写一个host name 对应一个ip,所以这个不是arp绑定,要区分。 # dhcp-host=11:22:33:44:55:66,192.168.1.60 # Always set the name of the host with hardware address # 11:22:33:44:55:66 to be "fred" # 绑定mac地址对应一个host name ,我个人觉得绑定mac对应ip就足够了,绑定对应名字比较少见 # dhcp-host=11:22:33:44:55:66,fred # Always give the host with ethernet address 11:22:33:44:55:66 # the name fred and IP address 192.168.0.60 and lease time 45 minutes # 这个是组合版,绑定某个mac对应fred名字,然后加上一个ip分配,并设置租约,这个只能说是灵活配置的参考,没啥实际意义 # dhcp-host=11:22:33:44:55:66,fred,192.168.0.60,45m # Give a host with ethernet address 11:22:33:44:55:66 or # 12:34:56:78:90:12 the IP address 192.168.0.60. Dnsmasq will assume # that these two ethernet interfaces will never be in use at the same # time, and give the IP address to the second, even if it is already # in use by the first. Useful for laptops with wired and wireless # addresses. # 绑定一个ip对应多mac地址,用途场景存在于实验室和无线网络,我想只是为了让2块网卡用同一个ip这样单纯而纯洁的需求而已[不常用] # dhcp-host=11:22:33:44:55:66,12:34:56:78:90:12,192.168.0.60 # Give the machine which says its name is "bert" IP address # 192.168.0.70 and an infinite lease # 绑定名字对应ip,并且给了一个新参数,无限租约 # dhcp-host=bert,192.168.0.70,infinite # Always give the host with client identifier 01:02:02:04 # the IP address 192.168.0.60 # 给予一个特殊标识符对应ip,用途不明 # dhcp-host=id:01:02:02:04,192.168.0.60 # Always give the host with client identifier "marjorie" # the IP address 192.168.0.60 # 跟上一条类似,只是标识符还支持普通字符字串 # dhcp-host=id:marjorie,192.168.0.60 # 通过/etc/hosts来分配对应的hostname # Enable the address given for "judge" in /etc/hosts # to be given to a machine presenting the name "judge" when # it asks for a DHCP lease. # dhcp-host=judge # 忽略下面MAC地址的DHCP请求,不分配ip # Never offer DHCP service to a machine whose ethernet # address is 11:22:33:44:55:66 #dhcp-host=11:22:33:44:55:66,ignore # If this line is uncommented, dnsmasq will read /etc/ethers and act # on the ethernet-address/IP pairs found there just as if they had # been given as --dhcp-host options. Useful if you keep # MAC-address/host mappings there for other purposes. # 使用额外的文件代替主配置文件来处理dhcp-host的匹配,这个主要为了方便管理,将所有需要用到的dhcp-host配置都放进/etc/ethers # 设置默认租期 # Set the limit on DHCP leases, the default is 150 #dhcp-lease-max=150 # 租期保存在下面文件 # The DHCP server needs somewhere on disk to keep its lease database. # This defaults to a sane location, but if you want to change it, use # the line below. #dhcp-leasefile=/var/lib/dnsmasq/dnsmasq.leases # Set this (and domain: see below) if you want to have a domain # automatically added to simple names in a hosts-file. # 自动给hosts的域名增加一个简单的名字,搭配下面的domain用的[不常用] expand-hosts # dhcp所在的域 # Set the domain for dnsmasq. this is optional, but if it is set, it # does the following things. # 1) Allows DHCP hosts to have fully qualified domain names, as long # as the domain part matches this setting. # 2) Sets the "domain" DHCP option thereby potentially setting the # domain of all systems configured by DHCP # 3) Provides the domain part for "expand-hosts" domain=hi-linux.com # 设置默认路由出口 # dhcp-option遵循RFC 2132(Options and BOOTP Vendor Extensions),可以通过dnsmasq --help dhcp来查看具体的配置 # 很多高级的配置,如iSCSI连接配置等同样可以由RFC 2132定义的dhcp-option中给出。 # option 3为default route # Override the default route supplied by dnsmasq, which assumes the # router is the same machine as the one running dnsmasq. dhcp-option=3,192.168.1.1 # 设置NTP Server.这是使用option name而非选项名来进行设置 # Set the NTP time server addresses to 192.168.0.4 and 10.10.0.5 #dhcp-option=option:ntp-server,192.168.0.4,10.10.0.5
注意:当为某一MAC地址同时静态分配主机名和IP时,如果写到两条dhcp-host选项里(如下所示),则只会生效后面的一条。正确的选项写法(如上配置)。 dhcp-host=00:0C:29:5E:F2:6F,192.168.1.201 dhcp-host=00:0C:29:5E:F2:6F,os02
下面在客户端进行测试 1.重新启动dnsmasq服务(server的IP为192.168.1.132) 由于之前测试中客户端网卡已经申请了DHCP租期。所以这里需要修改租期文件,让客户端重新获得IP和hostname。 DNSmasq服务的租期信息存储在/var/lib/dnsmasq/dnsmasq.leases这个文件。如果这个租约需要被更快地移除,您可以停止DNSmasq服务,从dnsmasq.leases文件中移除这个租约,然后再启动这个服务。 $ /etc/init.d/dnsmasq stop $ vim /var/lib/dnsmasq/dnsmasq.leases # 删除对应的租约信息 1400240493 00:0c:29:5e:f2:6f 192.168.1.143 os02 * 1400240498 00:0c:29:15:63:cf 192.168.1.52 os01 * $ /etc/init.d/dnsmasq restart
2.确保网络接口配置使用dhcp方式 $ cat /etc/sysconfig/network-scripts/ifcfg-eth1 DEVICE="eth1" BOOTPROTO=dhcp IPV6INIT=no NM_CONTROLLED=no ONBOOT="yes" TYPE="Ethernet"
3.重启网络服务 $ service network restart Shutting down interface eth0: [ OK ] Shutting down loopback interface: [ OK ] Bringing up loopback interface: [ OK ] Bringing up interface eth0: Determining IP information for eth1... done. [ OK ]
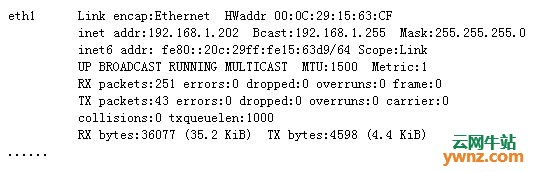
4.检查IP地址 $ ifconfig
5.检查默认路由 $ route -n
相关主题 |