|
以上方法教你把安装OpenVPN到Ubuntu 18.04.1服务器上,与Ubuntu 16.04版本的方法稍有不同,按照以下详细步骤操作就能成功,前提要求是服务器要有Sudo权限,ufw可SSH。文章最后还附上了Tunnelblick连接Ubuntu18.04.1服务器上的Openvpn但不能上网的解决方法。
参考文章 讲解在Ubuntu 18.04系统下配置openvpn的方法
1、安装Openvpn和EasyRSA 先更新下软件,安装Openvpn,这个简单,就不上图了。 sudo -s apt update apt upgrade apt install openvpn #现在装easyrsa,现在是V3.0.5版本了 root@AX:~# cd root@AX:~# wget -P ~/ https://github.com/OpenVPN/easy-rsa/releases/download/v3.0.5/EasyRSA-nix-3.0.5.tgz --2019-01-05 9:00:14-- https://github.com/OpenVPN/easy-rsa/releases/download/v3.0.5/EasyRSA-nix-3.0.5.tgz Resolving github.com (github.com)... 140.82.118.4, 140.82.118.3 #此处略过 ... Saving to: ‘/home/axing/EasyRSA-nix-3.0.5.tgz’ EasyRSA-nix-3.0.5.t 100%[===================>] 49.09K --.-KB/s in 0.08s 2019-01-05 9:00:15 (649 KB/s) - ‘/home/axing/EasyRSA-nix-3.0.5.tgz’ saved [50270/50270] root@CFL-LD8-84:~# tar xvf EasyRSA-nix-3.0.5.tgz EasyRSA-3.0.5/ EasyRSA-3.0.5/easyrsa EasyRSA-3.0.5/openssl-easyrsa.cnf EasyRSA-3.0.5/vars.example EasyRSA-3.0.5/x509-types/ EasyRSA-3.0.5/gpl-2.0.txt EasyRSA-3.0.5/mktemp.txt EasyRSA-3.0.5/COPYING.md EasyRSA-3.0.5/ChangeLog EasyRSA-3.0.5/README.md EasyRSA-3.0.5/README.quickstart.md EasyRSA-3.0.5/doc/ EasyRSA-3.0.5/easyrsa-e EasyRSA-3.0.5/doc/EasyRSA-Advanced.md EasyRSA-3.0.5/doc/EasyRSA-Readme.md EasyRSA-3.0.5/doc/EasyRSA-Upgrade-Notes.md EasyRSA-3.0.5/doc/Hacking.md EasyRSA-3.0.5/doc/Intro-To-PKI.md EasyRSA-3.0.5/x509-types/COMMON EasyRSA-3.0.5/x509-types/ca EasyRSA-3.0.5/x509-types/client EasyRSA-3.0.5/x509-types/code-signing EasyRSA-3.0.5/x509-types/server
2、配置Easyrsa及生成公钥 root@AX:~# cd EasyRSA-3.0.5/ root@AX:~/EasyRSA-3.0.5# ls vars.example vars.example root@AX:~/EasyRSA-3.0.5# cp vars.example vars #拷贝模板并修改vars的参数 root@AX:~/EasyRSA-3.0.5#vim vars #找到以下,取消注释 ... #set_var EASYRSA_REQ_COUNTRY "US" #set_var EASYRSA_REQ_PROVINCE "California" #set_var EASYRSA_REQ_CITY "San Francisco" #set_var EASYRSA_REQ_ORG "Copyleft Certificate Co" #set_var EASYRSA_REQ_EMAIL "me@example.net" #set_var EASYRSA_REQ_OU "My Organizational Unit" #稍作修改,改成类似下面我的配置 set_var EASYRSA_REQ_COUNTRY "UK" set_var EASYRSA_REQ_PROVINCE "LONDON" set_var EASYRSA_REQ_CITY "London" set_var EASYRSA_REQ_ORG "xxx" set_var EASYRSA_REQ_EMAIL "xxx@xxx.co.uk" set_var EASYRSA_REQ_OU "xxx Ltd" ... #生成公钥 root@AX:~/EasyRSA-3.0.5# ./easyrsa init-pki Note: using Easy-RSA configuration from: ./vars Using SSL: openssl OpenSSL 1.1.0g 2 Nov 2017 init-pki complete; you may now create a CA or requests. Your newly created PKI dir is: /home/axing/EasyRSA-3.0.5/pki root@AX:~/EasyRSA-3.0.5# ./easyrsa build-ca nopass Note: using Easy-RSA configuration from: ./vars Using SSL: openssl OpenSSL 1.1.0g 2 Nov 2017 Generating RSA private key, 2048 bit long modulus ....................+++ ....................+++ e is 65537 (0x010001) You are about to be asked to enter information that will be incorporated into your certificate request. What you are about to enter is what is called a Distinguished Name or a DN. There are quite a few fields but you can leave some blank For some fields there will be a default value, If you enter '.', the field will be left blank. ----- Common Name (eg: your user, host, or server name) [Easy-RSA CA]: CA creation complete and you may now import and sign cert requests. Your new CA certificate file for publishing is at: /home/axing/EasyRSA-3.0.5/pki/ca.crt "nopass"参数是避免每次都要输入密码,可选项 这一步完成后,在pki目录下会生成ca.crt,pki/private目录下生成ca.key
3、生成服务器证书和加密文件 #这里的axvpn是我的服务器名称,可以使用默认server作为服务器名称 root@CFL-LD8-84:~/EasyRSA-3.0.5# ./easyrsa gen-req axvpn nopass Note: using Easy-RSA configuration from: ./vars Using SSL: openssl OpenSSL 1.1.0g 2 Nov 2017 Generating a 2048 bit RSA private key ....................+++ ....................+++ writing new private key to '/home/axing/EasyRSA-3.0.5/pki/private/axvpn.key.06St6HRfIZ' ----- You are about to be asked to enter information that will be incorporated into your certificate request. What you are about to enter is what is called a Distinguished Name or a DN. There are quite a few fields but you can leave some blank For some fields there will be a default value, If you enter '.', the field will be left blank. ----- Common Name (eg: your user, host, or server name) [axvpn]: Keypair and certificate request completed. Your files are: req: /home/axing/EasyRSA-3.0.5/pki/reqs/axvpn.req key: /home/axing/EasyRSA-3.0.5/pki/private/axvpn.key 这里得到两个文件,在pki/private目录下,axvpn.req和axvpn.key 拷贝服务器私钥文件到openvpn配置文件目录下 root@AX:~/EasyRSA-3.0.5# cp pki/private/axvpn.key /etc/openvpn
4、生成公钥 因为同一台服务器即做CA服务器又做VPN服务器,自己给自己签发的时候会生成同名文件,先把服务器的请求文件改个名,再导入请求 root@AX:~/EasyRSA-3.0.5# mv pki/reqs/axvpn.req pki/reqs/axvpn2.req root@AX:~/EasyRSA-3.0.5# ./easyrsa import-req pki/reqs/axvpn2.req axvpn Note: using Easy-RSA configuration from: ./vars Using SSL: openssl OpenSSL 1.1.0g 2 Nov 2017 The request has been successfully imported with a short name of: axvpn You may now use this name to perform signing operations on this request. 签发请求 root@CFL-LD8-84:~/EasyRSA-3.0.5# ./easyrsa sign-req server axvpn Note: using Easy-RSA configuration from: ./vars Using SSL: openssl OpenSSL 1.1.0g 2 Nov 2017 You are about to sign the following certificate. Please check over the details shown below for accuracy. Note that this request has not been cryptographically verified. Please be sure it came from a trusted source or that you have verified the request checksum with the sender. Request subject, to be signed as a server certificate for 1080 days: subject= commonName = axvpn Type the word 'yes' to continue, or any other input to abort. Confirm request details: yes Using configuration from ./safessl-easyrsa.cnf Can't open /home/axing/EasyRSA-3.0.5/pki/index.txt.attr for reading, No such file or directory 139895844725184:error:02001002:system library:fopen:No such file or directory:../crypto/bio/bss_file.c:74:fopen('/home/axing/EasyRSA-3.0.5/pki/index.txt.attr','r') 139895844725184:error:2006D080:BIO routines:BIO_new_file:no such file:../crypto/bio/bss_file.c:81: Check that the request matches the signature Signature ok The Subject's Distinguished Name is as follows commonName :ASN.1 12:'axvpn' Certificate is to be certified until Dec 18 10:36:38 2021 GMT (1080 days) Write out database with 1 new entries Data Base Updated Certificate created at: /home/axing/EasyRSA-3.0.5/pki/issued/axvpn.crt 这里有个错误提示,”Can't open /home/axing/EasyRSA-3.0.5/pki/index.txt.attr for reading, No such file or directory“ 不过不影响使用,结果是把生成的axvpn.crt文件放到了pki/issued目录下。 把axvpn.crt文件和ca.crt文件一起复制到openvpn配置文件目录下 root@AX:~/EasyRSA-3.0.5# cp pki/ca.crt pki/issued/axvpn.crt /etc/openvpn/ 生成加密文件(可选,可以提高VPN安全性),这个比较慢,需要稍等几分钟 root@AX:~/EasyRSA-3.0.5# ./easyrsa gen-dh Note: using Easy-RSA configuration from: ./vars Using SSL: openssl OpenSSL 1.1.0g 2 Nov 2017 Generating DH parameters, 2048 bit long safe prime, generator 2 This is going to take a long time ..................+.................. DH parameters of size 2048 created at /home/axing/EasyRSA-3.0.5/pki/dh.pem 在pki目录下生成一个dh.pem的文件,然后生成Diffie-Hellman root@AX:~/EasyRSA-3.0.5# openvpn --genkey --secret ta.key 现在我们又有了一个ta.key文件,现在把这几个文件复制到openvpn的配置文件目录 root@AX:~/EasyRSA-3.0.5# cp ta.key pki/dh.pem /etc/openvpn/ 现在服务器端就都准备好了。
5、生成客户端证书和密钥 建一个目录存放客户端文件 root@AX:~/EasyRSA-3.0.5# mkdir -p ~/client-conf/key root@AX:~/EasyRSA-3.0.5# chmod -R 700 ~/client-conf/ root@AX:~/EasyRSA-3.0.5# ls -ld ~/client-conf/key/ drwx------ 2 root root 4096 Jan 5 10:18 /home/axing/client-conf/key/ 给客户端起名client root@CFL-LD8-84:~/EasyRSA-3.0.5# ./easyrsa gen-req client nopass Note: using Easy-RSA configuration from: ./vars Using SSL: openssl OpenSSL 1.1.0g 2 Nov 2017 Generating a 2048 bit RSA private key ..........................+++ .+++ writing new private key to '/home/axing/EasyRSA-3.0.5/pki/private/client.key.wgjLsABJan' ----- You are about to be asked to enter information that will be incorporated into your certificate request. What you are about to enter is what is called a Distinguished Name or a DN. There are quite a few fields but you can leave some blank For some fields there will be a default value, If you enter '.', the field will be left blank. ----- Common Name (eg: your user, host, or server name) [client]: Keypair and certificate request completed. Your files are: req: /home/axing/EasyRSA-3.0.5/pki/reqs/client.req key: /home/axing/EasyRSA-3.0.5/pki/private/client.key 现在pki下生成了client.req,pki/private下生成了client.key,把这个文件放到客户文件夹里 root@AX:~/EasyRSA-3.0.5# cp pki/private/client.key ~/client-conf/key/ 跟服务器一样操作,因为会生成同样名称的文件,先改下文件名,再导入请求文件,最后签发请求。 root@AX:~/EasyRSA-3.0.5# ./easyrsa import-req pki/reqs/clienta.req client Note: using Easy-RSA configuration from: ./vars Using SSL: openssl OpenSSL 1.1.0g 2 Nov 2017 The request has been successfully imported with a short name of: client You may now use this name to perform signing operations on this request. root@AX:~/EasyRSA-3.0.5# ./easyrsa sign-req client client Note: using Easy-RSA configuration from: ./vars Using SSL: openssl OpenSSL 1.1.0g 2 Nov 2017 You are about to sign the following certificate. Please check over the details shown below for accuracy. Note that this request has not been cryptographically verified. Please be sure it came from a trusted source or that you have verified the request checksum with the sender. Request subject, to be signed as a client certificate for 1080 days: subject= commonName = client Type the word 'yes' to continue, or any other input to abort. Confirm request details: yes Using configuration from ./safessl-easyrsa.cnf Check that the request matches the signature Signature ok The Subject's Distinguished Name is as follows commonName :ASN.1 12:'client' Certificate is to be certified until Dec 18 15:30:48 2021 GMT (1080 days) Write out database with 1 new entries Data Base Updated Certificate created at: /home/axing/EasyRSA-3.0.5/pki/issued/client.crt 现在生成了client.crt文件 把这几个文件复制到客户文件目录中 root@AX:~/EasyRSA-3.0.5# cp pki/issued/client.crt ta.key pki/ca.crt ~/client-conf/key/ root@AX:~/EasyRSA-3.0.5# ls ~/client-conf/key/ ca.crt client.crt client.key ta.key 到这一步,客户端文件就都准备好了。
6、配置openvpn服务,先把模板拷到配置文件目录 root@AX:~/EasyRSA-3.0.5# sudo cp /usr/share/doc/openvpn/examples/sample-config-files/server.conf.gz /etc/openvpn/ root@AX:~/EasyRSA-3.0.5# gzip -d /etc/openvpn/server.conf.gz root@AX:~/EasyRSA-3.0.5# vim /etc/openvpn/server.conf 下面是配置文件的一些修改,列举了可能用的到的 # 监听的端口号,默认1194,如果要改的话防火墙也要相应修改。(可选) port 1194 #TCP或UDP,如改成tcp的话,通常端口相应修改成443 ;proto tcp proto udp # 设置SSL/TLS根证书(ca)、证书(cert)和私钥(key),记得我的服务器名是axvpn,这里也要相应修改 (必选) ca ca.crt cert axvpn.crt key axvpn.key # 指定迪菲·赫尔曼参数。 # 默认是dh2048.pem, 记得我们生成了dh.pem,改下 (必选) dh dh.pem # 推送路由信息到客户端,以允许客户端能够连接到服务器背后的其他私有子网。 (可选) # 就是允许客户端访问VPN服务器自身所在的其他局域网 ;push "route 192.168.10.0 255.255.255.0" ;push "route 192.168.20.0 255.255.255.0" push "route 10.111.0.0 255.255.0.0" # 如果启用该指令,所有客户端的默认网关都将重定向到VPN,这将导致诸如web浏览器、DNS查询等所有客户端流量都经过VPN。(可选) ;push "redirect-gateway def1 bypass-dhcp" # 某些具体的Windows网络设置可以被推送到客户端,例如DNS或WINS服务器地址。(可选) # 下列地址来自opendns.com提供的Public DNS 服务器。 ;push "dhcp-option DNS 208.67.222.222" ;push "dhcp-option DNS 208.67.220.220" push "dhcp-option DNS 8.8.8.8" # 如果有注释的话,取消这句的注释,再加一句 (必选) tls-auth ta.key 0 # 该文件应该保密 key-direction 0 # 选择一个密码加密算法。 # 该配置项也必须复制到每个客户端配置文件中。 # 添加SHA256算法 cipher AES-256-CBC auth SHA256 # 在完成初始化工作之后,降低OpenVPN守护进程的权限, (最好取消注释) # 该指令仅限于非Windows系统中使用。 user nobody group nobody # Notify the client that when the server restarts so it # can automatically reconnect. # 如果协议改成了TCP,这里数值要改成0 explicit-exit-notify 1
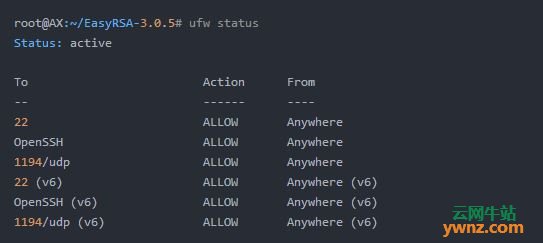
7、调整服务器网络配置 首先设置允许ip转发,设置并使其生效 root@AX:~/EasyRSA-3.0.5# vim /etc/sysctl.conf ... # Uncomment the next line to enable packet forwarding for IPv4 # 取消注释 net.ipv4.ip_forward=1 #保存退出 root@AX:~/EasyRSA-3.0.5# sysctl -p net.ipv4.ip_forward = 1 修改UFW防火墙配置,这之前要确认ubuntu启用了ufw,并做了初始设定(允许SSH等) #确认网络接口名称,这里是ens3 root@AX:~/EasyRSA-3.0.5# ip route | grep def default via 46.102.170.81 dev ens3 onlink 修改配置文件,在文件前面添加默认策略设置,以伪装vpn流量 root@AX:~/EasyRSA-3.0.5# vim /etc/ufw/before.rules # START OPENVPN RULES # NAT table rules *nat :POSTROUTING ACCEPT [0:0] # Allow traffic from OpenVPN client to eth0(changeto the interface you discovered!) -A POSTROUTING -s 10.8.0.0/8 -o ens3 -j MASQUERADE COMMIT # END OPENVPN RULES ... 保存退出。 修改防火墙规则,允许默认转发数据包,把"DROP"改成"ACCEPT" root@AX:~/EasyRSA-3.0.5# vim /etc/default/ufw DEFAULT_FORWARD_POLICY="ACCEPT" 允许vpn流量通过防火墙 root@AX:~/EasyRSA-3.0.5# ufw allow 1194/udp root@AX:~/EasyRSA-3.0.5# ufw allow openssh 我的防火墙看起来是这个样子的 root@AX:~/EasyRSA-3.0.5# ufw status
8、启动openvpn服务,创建开机启动 这里的@server是指使用server.conf配置文件。第一条命令没什么输出的话表示运行正常,再运行第二天命令设置开机启动。 root@AX:~/EasyRSA-3.0.5# systemctl start openvpn@server root@AX:~/EasyRSA-3.0.5# systemctl enable openvpn@server.service
9、创建客户端配置文件 终于到最后一步了,拷个模板先,当然,名字随便起 root@AX:~/EasyRSA-3.0.5# cp /usr/share/doc/openvpn/examples/sample-config-files/client.conf ~/client-conf/axclient.conf 修改配置文件,要与server里的配置对应 root@AX:~/EasyRSA-3.0.5# vim ~/client-conf/axclient.conf ... remote xx.xx.xxx.xx 1194 ;remote my-server-2 1194 # Downgrade privileges after initialization (non-Windows only) user nobody group nogroup # SSL/TLS parms. # See the server config file for more # description. It's best to use # a separate .crt/.key file pair # for each client. A single ca # file can be used for all clients. ca ca.crt cert client.crt key client.key # If a tls-auth key is used on the server # then every client must also have the key. tls-auth ta.key 1 key-direction 1 # Select a cryptographic cipher. # If the cipher option is used on the server # then you must also specify it here. # Note that v2.4 client/server will automatically # negotiate AES-256-GCM in TLS mode. # See also the ncp-cipher option in the manpage cipher AES-256-CBC auth SHA256 #很多文档都添加下面这些 # 这几行建议添加,如果是linux客户端而且有/etc/openvpn/update-resolv-conf文件就取消注释 # 如果不是就保持注释状态 # script-security 2 # up /etc/openvpn/update-resolv-conf # down /etc/openvpn/update-resolv-conf 保存退出。 按照说明建立一个sh脚本生成客户端配置文件 vim ~/client-configs/make_config.sh 复制以下内容: #!/bin/bash # First argument: Client identifier KEY_DIR=~/client-configs/keys OUTPUT_DIR=~/client-configs/files BASE_CONFIG=~/client-configs/base.conf cat ${BASE_CONFIG} \ <(echo -e '<ca>') \ ${KEY_DIR}/ca.crt \ <(echo -e '</ca>\n<cert>') \ ${KEY_DIR}/${1}.crt \ <(echo -e '</cert>\n<key>') \ ${KEY_DIR}/${1}.key \ <(echo -e '</key>\n<tls-auth>') \ ${KEY_DIR}/ta.key \ <(echo -e '</tls-auth>') \ > ${OUTPUT_DIR}/${1}.ovpn 修改权限: chmod 700 ~/client-configs/make_config.sh 运行脚本,生成客户端配置文件 cd ~/client-configs ./make_config.sh client
结语 所有步骤都没问题的话,会在~/client-configs/file文件夹中生成一个.ovpn文件,大功告成,可以使用了。
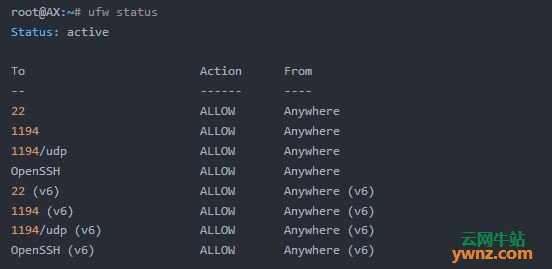
附:Tunnelblick连接Ubuntu18.04.1服务器上的Openvpn但不能上网的解决 在另一台服务器上装了OpenVPN,使用的是Ubuntu 18.04.01操作系统,装完以后,从笔记本上导入Tunnelblick,连接VPN正常,但怎么都不能上网,Ping 8.8.8.8也不通。按照要点一条条排查,如下: 1、查看端口转发 root@AX:~# vim /etc/sysctl.conf ... net.ipv4.ip_forward=1 ... 2、查看ufw防火墙配置 root@AX:~# ip route | grep default default via xx.102.170.xx dev ens3 onlink #网卡是 ens3 检查UFW的nat表中的POSTROUTING链默认策略,用于伪装来自VPN的流量 root@AX:~# vim /etc/ufw/before.rules ... # START OPENVPN RULES # NAT table rules *nat :POSTROUTING ACCEPT [0:0] # Allow traffic from OpenVPN client to wlp11s0 (change to the interface you discovered!) -A POSTROUTING -s 10.8.0.0/8 -o ens3 -j MASQUERADE COMMIT # END OPENVPN RULES ... 3、检查ufw流量转发设置 root@AX:~# vim /etc/default/ufw # if you change this you will most likely want to adjust your rules DEFAULT_FORWARD_POLICY="DROP" 找到问题了,这里要改成"ACCEPT" DEFAULT_FORWARD_POLICY="ACCEPT" 改完之后重启UFW,看下状态 root@AX:~# ufw status
4、重新连接VPN 到这里已经一切顺利了,期间查看网上问题有说Tunnelblick版本低的,升级到最新也不行,还是要靠一步步排查才能找到问题所在,并根据实际问题进行解决。
相关主题 搭建VPN工具Algo,Streisand,OpenVPN,StrongSwan,SoftEther,WireGuard |