|
本文介绍使用安全Letsencrypt SSL证书和Nginx的方式在CentOS 7服务器上安装和配置LibreNMS监视工具。
简介 LibreNMS是基于社区的GPL许可自动发现网络监控工具,基于PHP、MySQL和SNMP,LibreNMS包括对各种网络硬件和操作系统的支持,包括Juniper、Cisco、Linux、Foundry、FreeBSD、Brocade、HP、Windows等等,它是Observium监控工具的一个分支。 LibreNMS的特点: 具有自动发现功能,它将使用CDP、FDP、LLDP、OSPF、BGP、SNMP和ARP自动发现整个网络。 API访问,LibreNMS提供了一个完整的API来管理,绘制和检索安装中的数据。 自动更新,使用LibreNMS,可以通过新功能和错误修复自动保持最新状态。 可定制的警报,高度灵活的警报系统,通过电子邮件、IRC等通知。 计费系统,根据使用或转移,轻松为网络上的端口生成带宽费用。 Android和iOS应用程序,有一个本机iPhone/Android应用程序可用,它提供核心功能。 多种身份验证方法:MySQL、HTTP、LDAP、Radius、Active Directory。 集成支持NfSen、collectd、SmokePing、RANCID、Oxidized。
一、基本配置和安装PHP、Nginx、数据库 1、将SELinux置于许可模式 sudo setenforce 0 要保留更改,请编辑SELinux配置文件 $ sudo vim /etc/selinux/config SELINUX=permissive 2、将EPEL存储库添加到系统中 sudo yum install epel-release sudo yum install yum-utils 3、安装所需的依赖项 sudo yum -y install zip unzip git cronie wget fping net-snmp net-snmp-utils ImageMagick jwhois mtr rrdtool MySQL-python nmap python-memcached 4、安装PHP和Nginx PHP将从REMI存储库安装,将其添加到系统中,如下所示: sudo yum install http://rpms.remirepo.net/enterprise/remi-release-7.rpm 禁用默认启用的remi-php54 repo,并为PHP 7.2启用存储库,需要安装PHP 7.3请参考在Ubuntu 18.04或CentOS 7系统上安装PHP 7.3一文: sudo yum-config-manager --disable remi-php54 sudo yum-config-manager --enable remi-php72 然后最后安装所需的php模块: sudo yum -y install php php-{cli,mbstring,process,fpm,mysqlnd,zip,snmp,devel,gd,mcrypt,mbstring,curl,xml,pear,bcmath} 5、配置PHP sudo vim /etc/php-fpm.d/www.conf 设置下面的变量: user = nginx group = nginx listen = /var/run/php-fpm/php-fpm.sock listen.owner = nginx listen.group = nginx listen.mode = 0660 设置PHP时区: $ sudo vim /etc/php.ini date.timezone = Asia/Shanghai 6、安装nginx Web服务器 sudo yum install nginx 启动nginx和php-fpm服务: for i in nginx php-fpm; do sudo systemctl enable $i sudo systemctl start $i done 7、安装和配置数据库 使用以下指南在CentOS 7服务器上安装MariaDB数据库: 在CentOS 7服务器中安装MariaDB 10.4的方法 编辑my.cnf文件并在[mysqld]部分中添加以下行: $ sudo vim /etc/my.cnf [mysql] innodb_file_per_table=1 lower_case_table_names=0 进行更改后重新启动MariaDB服务器: sudo systemctl enable mariadb sudo systemctl restart mariadb 安装并运行数据库后,以root用户身份登录: $ mysql -u root -p 创建数据库和用户: CREATE DATABASE librenms CHARACTER SET utf8 COLLATE utf8_general_ci; GRANT ALL PRIVILEGES ON librenms.* TO 'librenms_user'@'localhost' IDENTIFIED BY "Password1234!"; FLUSH PRIVILEGES; EXIT;
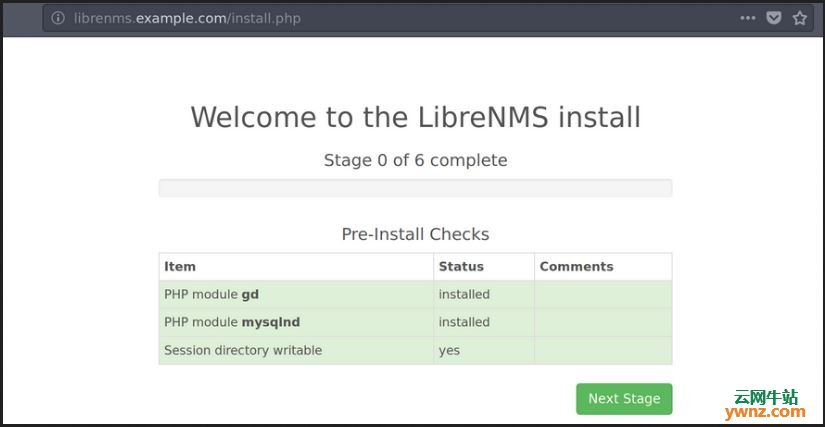
二、在CentOS 7下安装和配置LibreNMS 1、如果要使用Letsencrypt SSL证书,则需要先请求它,以root用户身份运行以下命令: wget https://dl.eff.org/certbot-auto -P /usr/local/bin chmod a+x /usr/local/bin/certbot-auto 如果正在运行firewalld服务,请在防火墙上启用http端口: sudo firewall-cmd --add-service={http,https} --permanent sudo firewall-cmd --reload 现在获取要使用的证书: export DOMAIN='librenms.example.com' export EMAIL="admin@example.com" certbot-auto certonly --standalone -d $DOMAIN --preferred-challenges http --agree-tos -n -m $EMAIL --keep-until-expiring 证书将放在/etc/letsencrypt/live/librenms.example.com/目录下。 2、从Github克隆LibreNMS项目 cd /opt sudo git clone https://github.com/librenms/librenms.git sudo chown librenms:librenms -R /opt/librenms 3、安装PHP依赖项 cd /opt/librenms ./scripts/composer_wrapper.php install --no-dev 成功安装应具有类似于以下的输出: .... Generating autoload files > LibreNMS\ComposerHelper::postInstall setfacl -R -m g::rwx rrd/ logs/ storage/ bootstrap/cache/ setfacl -d -m g::rwx rrd/ logs/ storage/ bootstrap/cache/ php artisan key:generate Application key [base64:/m3TCBxHJ5lFYdsCda+o9oxLTmmH1/3jXjLipmcIp+4=] set successfully. > Illuminate\Foundation\ComposerScripts::postInstall > php artisan optimize Generating optimized class loader The compiled services file has been removed. 4、将LibreNMS用户添加到系统 sudo useradd librenms -d /opt/librenms -M -r sudo usermod -a -G librenms nginx 5、复制并配置SNMP配置模板 sudo cp /opt/librenms/snmpd.conf.example /etc/snmp/snmpd.conf sudo vim /etc/snmp/snmpd.conf 通过替换RANDOMSTRINGGOESHERE来设置社区字符串: com2sec readonly default MyInternalNetwork 下载分发版本标识符脚本: sudo curl -o /usr/bin/distro https://raw.githubusercontent.com/librenms/librenms-agent/master/snmp/distro sudo chmod +x /usr/bin/distro 然后启动并启用snmpd服务: sudo systemctl enable snmpd sudo systemctl restart snmpd 完成所有操作后,为LibreNMS创建nginx配置文件。 6、没有SSL的Nginx配置 它位于/etc/nginx/conf.d/librenms.conf下: server { listen 80; server_name librenms.example.com; root /opt/librenms/html; index index.php; charset utf-8; gzip on; gzip_types text/css application/javascript text/javascript application/x-javascript image/svg+xml text/plain text/xsd text/xsl text/xml image/x-icon; location / { try_files $uri $uri/ /index.php?$query_string; } location /api/v0 { try_files $uri $uri/ /api_v0.php?$query_string; } location ~ \.php { include fastcgi.conf; fastcgi_split_path_info ^(.+\.php)(/.+)$; fastcgi_pass unix:/var/run/php-fpm/php-fpm.sock; } location ~ /\.ht { deny all; } } 7、使用SSL的Nginx配置 server { listen 80; root /opt/librenms/html; server_name librenms.example.com; return 301 https://$server_name$request_uri; } server { listen 443 ssl http2; server_name librenms.example.com; root /opt/librenms/html; index index.php; # Set Logs path access_log /var/log/nginx/access.log; error_log /var/log/nginx/error.log; # Configure SSL ssl_certificate /etc/letsencrypt/live/librenms.example.com/fullchain.pem; ssl_certificate_key /etc/letsencrypt/live/librenms.example.com/privkey.pem; # Enabling Gzip compression on Nginx charset utf-8; gzip on; gzip_types text/css application/javascript text/javascript application/x-javascript image/svg+xml text/plain text/xsd text/xsl text/xml image/x-icon; location / { try_files $uri $uri/ /index.php?$query_string; } location /api/v0 { try_files $uri $uri/ /api_v0.php?$query_string; } # PHP-FPM handle all .php files requests location ~ \.php { include fastcgi.conf; fastcgi_split_path_info ^(.+\.php)(/.+)$; fastcgi_pass unix:/run/php-fpm/php7.2-fpm.sock; } location ~ /\.ht { deny all; } } 确认nginx syntax: # nginx -t nginx: the configuration file /etc/nginx/nginx.conf syntax is ok nginx: configuration file /etc/nginx/nginx.conf test is successful 如果一切看起来都不错,请重启服务: sudo systemctl restart nginx 8、配置cron作业 sudo cp /opt/librenms/librenms.nonroot.cron /etc/cron.d/librenms 9、复制logrotate配置 LibreNMS将日志保存在/opt/librenms/logs中,随着时间的推移,这些可能会变大并被旋转出来。 要旋出旧日志,你可以使用提供的logrotate配置文件: sudo cp /opt/librenms/misc/librenms.logrotate /etc/logrotate.d/librenms 设置适当的权限: sudo chown -R librenms:librenms /opt/librenms setfacl -d -m g::rwx /opt/librenms/logs sudo setfacl -d -m g::rwx /opt/librenms/rrd /opt/librenms/logs /opt/librenms/bootstrap/cache/ /opt/librenms/storage/ sudo setfacl -R -m g::rwx /opt/librenms/rrd /opt/librenms/logs /opt/librenms/bootstrap/cache/ /opt/librenms/storage/ 10、启动LibreNMS Web安装程序 在Web浏览器上打开http://librenms.example.com/install.php以完成安装:
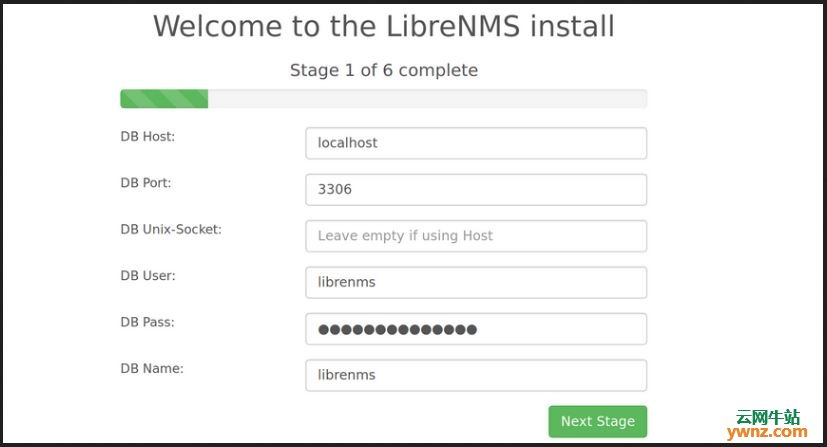
确认所有预安装检查通过并单击Next Stage继续。 配置先前创建的数据库帐户,它将开始导入数据库模式并填充数据:
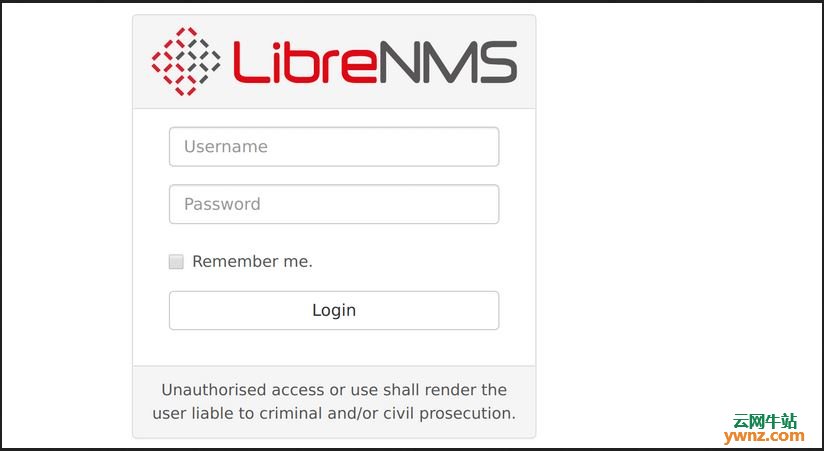
然后系统会要求你配置管理员用户帐户: Username: admin Password: StrongPassword 接下来是生成配置文件,如果无法创建,你可能必须手动创建文件,文件路径应为/opt/librenms/config.php: <?php ## Have a look in defaults.inc.php for examples of settings you can set here. DO NOT EDIT defaults.inc.php! ### Database config $config['db_host'] = 'localhost'; $config['db_port'] = '3306'; $config['db_user'] = 'librenms'; $config['db_pass'] = 'StrongPassword'; $config['db_name'] = 'librenms'; $config['db_socket'] = ''; // This is the user LibreNMS will run as //Please ensure this user is created and has the correct permissions to your install $config['user'] = 'librenms'; ### Locations - it is recommended to keep the default #$config['install_dir'] = "/opt/librenms"; ### This should *only* be set if you want to *force* a particular hostname/port ### It will prevent the web interface being usable form any other hostname #$config['base_url'] = "http://librenms.company.com"; ### Enable this to use rrdcached. Be sure rrd_dir is within the rrdcached dir ### and that your web server has permission to talk to rrdcached. #$config['rrdcached'] = "unix:/var/run/rrdcached.sock"; ### Default community $config['snmp']['community'] = array("public"); ### Authentication Model $config['auth_mechanism'] = "mysql"; # default, other options: ldap, http-auth #$config['http_auth_guest'] = "guest"; # remember to configure this user if you use http-auth ### List of RFC1918 networks to allow scanning-based discovery #$config['nets'][] = "10.0.0.0/8"; #$config['nets'][] = "172.16.0.0/12"; #$config['nets'][] = "192.168.0.0/16"; # Update configuration #$config['update_channel'] = 'release'; # uncomment to follow the monthly release channel #$config['update'] = 0; # uncomment to completely disable updates 将文件的所有权更改为librenms用户: sudo chown librenms:librenms /opt/librenms/config.php 单击完成安装按钮(Finish Install)以在CentOS 7系统下完成LibreNMS的安装。 现在就可以转到管理员登录页面了:
至此,LibreNMS安装全部完成。
相关主题 |