|
本文介绍在Ubuntu 18.04/Debian 9操作系统上安装PowerDNS和PowerDNS-Admin的方法,它可以运行在大多数Linux发行版上,完成安装需要MariaDB数据库。
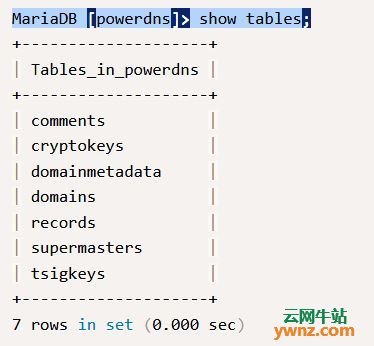
一、安装和配置MariaDB数据库 我们需要安装数据库,PowerDNS将使用它来存储区域文件,请注意,你还可以选择使用BIND等文本文件,我们选择的数据库服务器是MariaDB,参考: 在Debian 9/Debian 8系统中安装MariaDB 10.4数据库的步骤 在Ubuntu 18.04系统上安装MariaDB 10.4的步骤 安装并运行数据库后,继续在MariaDB中创建PowerDNS数据库和用户帐户: $ mysql -u root -p CREATE DATABASE powerdns; 接下来是创建powerdns数据库用户并分配权限: GRANT ALL ON powerdns.* TO 'powerdns'@'localhost' \ IDENTIFIED BY 'strongpassword'; 刷新权限以更新用户设置: FLUSH PRIVILEGES; 切换到powerdns数据库以创建表: USE powerdns; 创建所需的表: CREATE TABLE domains ( id INT AUTO_INCREMENT, name VARCHAR(255) NOT NULL, master VARCHAR(128) DEFAULT NULL, last_check INT DEFAULT NULL, type VARCHAR(6) NOT NULL, notified_serial INT UNSIGNED DEFAULT NULL, account VARCHAR(40) CHARACTER SET 'utf8' DEFAULT NULL, PRIMARY KEY (id) ) Engine=InnoDB CHARACTER SET 'latin1'; CREATE UNIQUE INDEX name_index ON domains(name); CREATE TABLE records ( id BIGINT AUTO_INCREMENT, domain_id INT DEFAULT NULL, name VARCHAR(255) DEFAULT NULL, type VARCHAR(10) DEFAULT NULL, content VARCHAR(64000) DEFAULT NULL, ttl INT DEFAULT NULL, prio INT DEFAULT NULL, change_date INT DEFAULT NULL, disabled TINYINT(1) DEFAULT 0, ordername VARCHAR(255) BINARY DEFAULT NULL, auth TINYINT(1) DEFAULT 1, PRIMARY KEY (id) ) Engine=InnoDB CHARACTER SET 'latin1'; CREATE INDEX nametype_index ON records(name,type); CREATE INDEX domain_id ON records(domain_id); CREATE INDEX ordername ON records (ordername); CREATE TABLE supermasters ( ip VARCHAR(64) NOT NULL, nameserver VARCHAR(255) NOT NULL, account VARCHAR(40) CHARACTER SET 'utf8' NOT NULL, PRIMARY KEY (ip, nameserver) ) Engine=InnoDB CHARACTER SET 'latin1'; CREATE TABLE comments ( id INT AUTO_INCREMENT, domain_id INT NOT NULL, name VARCHAR(255) NOT NULL, type VARCHAR(10) NOT NULL, modified_at INT NOT NULL, account VARCHAR(40) CHARACTER SET 'utf8' DEFAULT NULL, comment TEXT CHARACTER SET 'utf8' NOT NULL, PRIMARY KEY (id) ) Engine=InnoDB CHARACTER SET 'latin1'; CREATE INDEX comments_name_type_idx ON comments (name, type); CREATE INDEX comments_order_idx ON comments (domain_id, modified_at); CREATE TABLE domainmetadata ( id INT AUTO_INCREMENT, domain_id INT NOT NULL, kind VARCHAR(32), content TEXT, PRIMARY KEY (id) ) Engine=InnoDB CHARACTER SET 'latin1'; CREATE INDEX domainmetadata_idx ON domainmetadata (domain_id, kind); CREATE TABLE cryptokeys ( id INT AUTO_INCREMENT, domain_id INT NOT NULL, flags INT NOT NULL, active BOOL, content TEXT, PRIMARY KEY(id) ) Engine=InnoDB CHARACTER SET 'latin1'; CREATE INDEX domainidindex ON cryptokeys(domain_id); CREATE TABLE tsigkeys ( id INT AUTO_INCREMENT, name VARCHAR(255), algorithm VARCHAR(50), secret VARCHAR(255), PRIMARY KEY (id) ) Engine=InnoDB CHARACTER SET 'latin1'; CREATE UNIQUE INDEX namealgoindex ON tsigkeys(name, algorithm); 可以确认你的表已创建: MariaDB [powerdns]> show tables;
现在我们有了一个数据库和一个空表,PowerDNS现在应该可以用它启动了。
二、在Ubuntu 18.04/Debian 9上安装PowerDNS Ubuntu 18.04自带systemd-resolve,你需要禁用它,因为它绑定到端口53,这将与PowerDNS端口冲突。 运行以下命令以禁用已解析的服务: sudo systemctl disable systemd-resolved sudo systemctl stop systemd-resolved 另外,删除符号链接的resolv.conf文件: $ ls -lh /etc/resolv.conf lrwxrwxrwx 1 root root 39 Feb 20 15:50 /etc/resolv.conf -> ../run/systemd/resolve/stub-resolv.conf $ sudo rm /etc/resolv.conf 然后创建新的resolv.conf文件: sudo echo "nameserver 8.8.8.8" > /etc/resolv.conf 请注意,可以从官方apt存储库或PowerDNS存储库安装PowerDNS,要从apt存储库安装,请运行: sudo apt-get update sudo apt-get install pdns-server pdns-backend-mysql 为Ubuntu 18.04添加官方PowerDNS存储库: $ cat /etc/apt/sources.list.d/pdns.list deb [arch=amd64] http://repo.powerdns.com/ubuntu bionic-auth-41 main 导入GPG密钥: curl https://repo.powerdns.com/FD380FBB-pub.asc | sudo apt-key add - 更新软件包列表并安装PowerDNS软件包(pdns-server)和MySQL后端(pdns-backend-mysql): sudo apt-get update sudo apt-get install pdns-server pdns-backend-mysql 对于Debian 9,从apt存储库安装软件包而不添加新的repo: sudo apt-get update sudo apt-get install pdns-server pdns-backend-mysql 当询问是否使用dbconfig-common配置PowerDNS数据库时,请回答No。 然后配置PowerDNS以使用MySQL后端,这是我对PowerDNS的MySQL配置: # cat /etc/powerdns/pdns.d/pdns.local.gmysql.conf # MySQL Configuration # Launch gmysql backend launch+=gmysql # gmysql parameters gmysql-host=localhost gmysql-port=3306 gmysql-dbname=powerdns gmysql-user=powerdns gmysql-password=strongpassword gmysql-dnssec=yes # gmysql-socket= 重新启动pdns服务: sudo systemctl restart pdns 现在可以测试PowerDNS以确认该服务是否在线: # netstat -tap | grep pdns
检查PowerDNS服务是否正确响应: # dig @127.0.0.1 ; <<>> DiG 9.11.3-1ubuntu1.1-Ubuntu <<>> @127.0.0.1 ; (1 server found) ;; global options: +cmd ;; Got answer: ;; ->>HEADER<<- opcode: QUERY, status: REFUSED, id: 65465 ;; flags: qr rd; QUERY: 1, ANSWER: 0, AUTHORITY: 0, ADDITIONAL: 1 ;; WARNING: recursion requested but not available ;; OPT PSEUDOSECTION: ; EDNS: version: 0, flags:; udp: 1680 ;; QUESTION SECTION: ;. IN NS ;; Query time: 0 msec ;; SERVER: 127.0.0.1#53(127.0.0.1) ;; WHEN: Wed Feb 20 15:57:10 2019 ;; MSG SIZE rcvd: 28
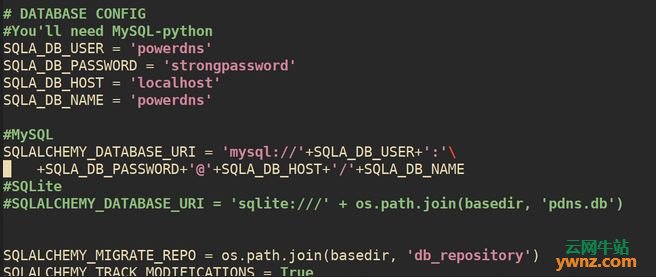
三、在Ubuntu 18.04/Debian 9上安装PowerDNS-Admin PowerDNS-Admin是一个具有以下高级功能的PowerDNS Web界面: 多域管理。 域模板。 用户管理。 基于域的用户访问管理。 用户活动记录。 本地DB/LDAP/Active Directory用户身份验证。 支持SAML身份验证。 Google OAuth身份验证。 Github OAuth身份验证。 支持双因素身份验证(TOTP)。 仪表板和pdns服务统计信息。 DynDNS 2协议支持。 直接使用IPv6地址编辑IPv6 PTR(不再编辑文字地址)。 安装Python 3开发包: sudo apt-get install python3-dev 从requirements.txt文件安装构建python库所需的包: sudo apt-get install -y libmysqlclient-dev python-mysqldb libsasl2-dev libffi-dev \ libldap2-dev libssl-dev libxml2-dev libxslt1-dev libxmlsec1-dev pkg-config 安装yarn以构建资产文件: sudo curl -sS https://dl.yarnpkg.com/debian/pubkey.gpg | apt-key add - sudo echo "deb https://dl.yarnpkg.com/debian/ stable main" > /etc/apt/sources.list.d/yarn.list sudo apt-get update sudo apt-get install yarn 结帐源代码并创建virtualenv: git clone https://github.com/ngoduykhanh/PowerDNS-Admin.git /opt/web/powerdns-admin cd /opt/web/powerdns-admin virtualenv -p python3 flask 输出: Already using interpreter /usr/bin/python3 Using base prefix '/usr' New python executable in /opt/web/powerdns-admin/flask/bin/python3 Also creating executable in /opt/web/powerdns-admin/flask/bin/python Installing setuptools, pkg_resources, pip, wheel...done. 激活python3环境并安装库: . ./flask/bin/activate pip install -r requirements.txt 创建和配置数据库: $ mysql -u root -p CREATE DATABASE powerdnsadmin; GRANT ALL PRIVILEGES ON powerdnsadmin.* TO 'pdnsadminuser'@'%' \ IDENTIFIED BY 'strongpassword'; FLUSH PRIVILEGES; quit 在运行PowerDNS-Admin之前,请确保你具有config.py可用,让我们从模板中创建一个: cp config_template.py config.py 将文件编辑为: vim config.py 这些是必需的配置: 数据库连接信息、PNDS API服务端点和API密钥、使用的端口号、绑定地址。 注释掉SQLite SQLALCHEMY_DATABASE_URI行并取消注释MySQL: # DATABASE CONFIG #You'll need MySQL-python SQLA_DB_USER = 'powerdns' SQLA_DB_PASSWORD = 'strongpassword' SQLA_DB_HOST = 'localhost' SQLA_DB_NAME = 'powerdns' #MySQL SQLALCHEMY_DATABASE_URI = 'mysql://'+SQLA_DB_USER+':'\ +SQLA_DB_PASSWORD+'@'+SQLA_DB_HOST+'/'+SQLA_DB_NAME #SQLite #SQLALCHEMY_DATABASE_URI = 'sqlite:///' + os.path.join(basedir, 'pdns.db') 见下面的截图:
一旦你的config.py准备好了,通过运行命令创建数据库模式: (flask)$ flask db migrate -m "Init DB" INFO [alembic.runtime.migration] Context impl MySQLImpl. INFO [alembic.runtime.migration] Will assume non-transactional DDL. INFO [alembic.autogenerate.compare] Detected removed index 'domainidindex' on 'cryptokeys' INFO [alembic.autogenerate.compare] Detected removed table 'cryptokeys' INFO [alembic.autogenerate.compare] Detected removed index 'namealgoindex' on 'tsigkeys' INFO [alembic.autogenerate.compare] Detected removed table 'tsigkeys' INFO [alembic.autogenerate.compare] Detected removed table 'supermasters' INFO [alembic.autogenerate.compare] Detected removed index 'nametype_index' on 'records' INFO [alembic.autogenerate.compare] Detected removed table 'records' INFO [alembic.autogenerate.compare] Detected removed index 'domainmetadata_idx' on 'domainmetadata' INFO [alembic.autogenerate.compare] Detected removed table 'domainmetadata' INFO [alembic.autogenerate.compare] Detected removed index 'name_index' on 'domains' INFO [alembic.autogenerate.compare] Detected removed table 'domains' INFO [alembic.autogenerate.compare] Detected removed index 'comments_name_type_idx' on 'comments' INFO [alembic.autogenerate.compare] Detected removed index 'comments_order_idx' on 'comments' INFO [alembic.autogenerate.compare] Detected removed table 'comments' Generating /opt/web/powerdns- admin/migrations/versions/42ca771ac430_init_db.py ... done 使用yarn生成资产文件: (flask)$ yarn install --pure-lockfile yarn install v1.9.4 [1/4] Resolving packages... [2/4] Fetching packages... [3/4] Linking dependencies... [4/4] Building fresh packages... Done in 14.59s. (flask)$ flask assets build Building bundle: generated/login.js [INFO] Building bundle: generated/login.js Building bundle: generated/login.css [INFO] Building bundle: generated/login.css Building bundle: generated/main.js [INFO] Building bundle: generated/main.js Building bundle: generated/main.css [INFO] Building bundle: generated/main.css 测试你的PowerDNS-Admin运行正常: (flask)$ ./run.py [INFO] * Running on http://127.0.0.1:9191/ (Press CTRL+C to quit) [INFO] * Restarting with stat [WARNING] * Debugger is active! [INFO] * Debugger PIN: 466-405-858
四、配置systemd服务和Nginx 我们将使用systemd管理PowerDNS-Admin,创建如下的服务单元文件: $ sudo vim /etc/systemd/system/powerdns-admin.service [Unit] Description=PowerDNS-Admin After=network.target [Service] User=root Group=root WorkingDirectory=/opt/web/powerdns-admin ExecStart=/opt/web/powerdns-admin/flask/bin/gunicorn --workers 2 --bind unix:/opt/web/powerdns-admin/powerdns-admin.sock app:app [Install] WantedBy=multi-user.target 启动Powerdns-Admin服务并将其设置为在启动时启动: sudo systemctl daemon-reload sudo systemctl start powerdns-admin sudo systemctl enable powerdns-admin 可以运行systemctl status powerdns-admin命令确认状态是否正在运行,没问题的话会返回相关的成功信息。
五、为Powerdns-Admin安装和配置Nginx 使用以下命令安装Nginx: sudo apt-get install nginx 配置Nginx: sudo vim /etc/nginx/conf.d/powerdns-admin.conf 添加如下内容: server { listen *:80; server_name powerdns-admin.example.com www.powerdns-admin.example.com; index index.html index.htm index.php; root /opt/web/powerdns-admin; access_log /var/log/nginx/powerdns-admin.local.access.log combined; error_log /var/log/nginx/powerdns-admin.local.error.log; client_max_body_size 10m; client_body_buffer_size 128k; proxy_redirect off; proxy_connect_timeout 90; proxy_send_timeout 90; proxy_read_timeout 90; proxy_buffers 32 4k; proxy_buffer_size 8k; proxy_set_header Host $host; proxy_set_header X-Real-IP $remote_addr; proxy_set_header X-Forwarded-For $proxy_add_x_forwarded_for; proxy_headers_hash_bucket_size 64; location ~ ^/static/ { include /etc/nginx/mime.types; root /opt/web/powerdns-admin/app; location ~* \.(jpg|jpeg|png|gif)$ { expires 365d; } location ~* ^.+.(css|js)$ { expires 7d; } } location / { proxy_pass http://unix:/opt/web/powerdns-admin/powerdns-admin.sock; proxy_read_timeout 120; proxy_connect_timeout 120; proxy_redirect off; } } 检查nginx syntax然后重启nginx服务: # nginx -t nginx: the configuration file /etc/nginx/nginx.conf syntax is ok nginx: configuration file /etc/nginx/nginx.conf test is successful # systemctl restart nginx 访问PowerDNS-Admin Web界面,地址是http://powerdns-admin.example.com/:
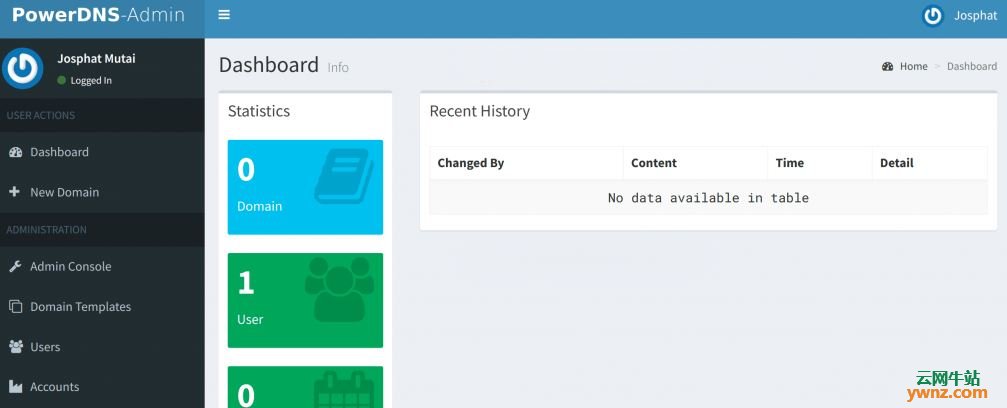
单击创建帐户按钮并注册用户,第一个用户将处于管理员角色。 当你使用创建的用户名和密码登录时,会出现如下的画面:
至此,你可以在Ubuntu 18.04/Debian 9服务器上使用PowerDNS-Admin管理PowerDNS了。
相关主题 |