|
本文介绍在CentOS 7操作系统上安装和配置Odoo 13的方法,我们将使用PostgreSQL数据库和Nginx作为在CentOS 7上运行的Odoo 13的前端代理。
一、添加EPEL存储库和安装PostgreSQL数据库参考文章 1、添加EPEL存储库 通过运行命令将EPEL存储库添加到CentOS 7: sudo yum -y install epel-release vim bash-completion 将SELinux置于permissive模式: sudo setenforce 0 sudo sed -i 's/^SELINUX=.*/SELINUX=permissive/g' /etc/selinux/config 参考:在CentOS 8上检查SELinux模式、将模式更改为Permissive及禁用的方法。 添加EPEL存储库后,建议更新系统: sudo yum -y update 2、安装PostgreSQL数据库参考文章 添加EPEL存储库后,在CentOS 7上安装PostgreSQL数据库,参考在CentOS 8服务器上安装及配置PostgreSQL数据库的方法。
二、安装wkhtmltopdf Odoo使用wkhtmltopdf生成PDF格式的报告,推荐安装wkhtmltopdf 0.12.5版本: sudo yum install -y https://github.com/wkhtmltopdf/wkhtmltopdf/releases/download/0.12.5/wkhtmltox-0.12.5-1.centos7.x86_64.rpm 确认安装的版本: $ wkhtmltopdf --version wkhtmltopdf 0.12.5 (with patched qt) 参考:在Ubuntu 18.04/Debian 10上安装wkhtmltopdf和wkhtmltoimage。
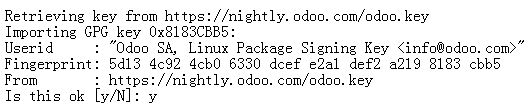
三、在CentOS 7上安装Odoo 13 现在开始在CentOS 7上安装Odoo 13,首先将Odoo Yum存储库添加到我们的系统中: sudo yum -y install yum-utils sudo yum-config-manager --add-repo=http://nightly.odoo.com/13.0/nightly/rpm/odoo.repo 储存库文件将添加到/etc/yum.repos.d/odoo.repo。 更新软件包索引并在CentOS 7操作系统上安装Odoo 13: sudo yum makecache fast sudo yum install odoo 我们先前添加的Base和EPEL存储库中安装了许多依赖程序包,按y键开始在CentOS 7上安装Odoo 13。 收到提示时,请接受GPG密钥的导入:
一个odoo systemd服务已创建但未启动,让我们启动它,并将其设置为启动: sudo systemctl enable --now odoo 确认Odoo服务是否设置为在启动时启动: $ systemctl is-enabled odoo enabled 检查是否正在运行: $ systemctl status odoo
一旦启动,Odoo服务应绑定到TCP 8069端口: $ ss -tunelp | grep 8069
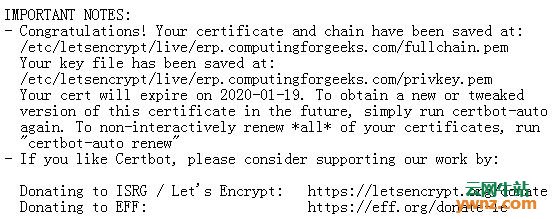
四、配置Nginx代理(没有SSL)和配置Nginx代理(使用SSL证书) 1、配置Nginx代理(没有SSL) 在CentOS 7上安装Nginx: sudo yum -y install nginx sudo systemctl enable --now nginx 为odoo创建一个新的配置文件: sudo vim /etc/nginx/conf.d/odoo.conf 修改此配置代码段以适合你的设置: # Odoo Upstreams upstream odooserver { server 127.0.0.1:8069; } server { listen 80; server_name erp.computingforgeeks.com; access_log /var/log/nginx/odoo_access.log; error_log /var/log/nginx/odoo_error.log; # Proxy settings proxy_read_timeout 720s; proxy_connect_timeout 720s; proxy_send_timeout 720s; proxy_set_header X-Forwarded-Host $host; proxy_set_header X-Forwarded-For $proxy_add_x_forwarded_for; proxy_set_header X-Forwarded-Proto $scheme; proxy_set_header X-Real-IP $remote_addr; # Request for root domain location / { proxy_redirect off; proxy_pass http://odooserver; } # Cache static files location ~* /web/static/ { proxy_cache_valid 200 90m; proxy_buffering on; expires 864000; proxy_pass http://odooserver; } # Gzip gzip_types text/css text/less text/plain text/xml application/xml application/json application/javascript; gzip on; } 将erp.computingforgeeks替换为你的域名,然后验证Nginx配置文件: $ sudo nginx -t 返回信息如下解释: nginx:配置文件/etc/nginx/nginx.conf语法正常。 nginx:配置文件/etc/nginx/nginx.conf测试成功。 如果一切正常,请重新启动Nginx: sudo systemctl restart nginx 2、配置Nginx代理(使用SSL证书) 如果你的服务器具有公共IP,则可以为你的域创建一个DNS A记录,以指向Odoo服务器并请求免费的Let's Encrypt SSL证书。 在CentOS 7上安装Nginx: sudo yum -y install nginx sudo systemctl enable --now nginx 安装certbot-auto工具: sudo yum -y install wget wget https://dl.eff.org/certbot-auto chmod +x certbot-auto sudo mv certbot-auto /usr/local/bin/certbot-auto 停止Nginx服务: sudo systemctl stop nginx 获取让我们为你的域加密SSL证书: export DOMAIN="erp.computingforgeeks.com" export EMAIL="myemail@computingforgeeks.com" sudo /usr/local/bin/certbot-auto certonly --standalone -d ${DOMAIN} --preferred-challenges http --agree-tos -n -m ${EMAIL} --keep-until-expiring 证书文件的路径显示在“IMPORTANT NOTES”部分中:
创建cron以续订证书: $ sudo crontab -e 15 3 * * * /usr/local/bin/certbot-auto renew --pre-hook "systemctl stop nginx" --post-hook "systemctl start nginx" 创建Nginx配置文件: sudo vim /etc/nginx/conf.d/odoo.conf 将以下内容粘贴到文件中,然后对其进行修改以适合你的环境: # Odoo Upstreams upstream odooserver { server 127.0.0.1:8069; } # http to https redirection server { listen 80; server_name erp.computingforgeeks.com; return 301 https://erp.computingforgeeks.com$request_uri; } server { listen 443 ssl; server_name erp.computingforgeeks.com; access_log /var/log/nginx/odoo_access.log; error_log /var/log/nginx/odoo_error.log; # SSL ssl_certificate /etc/letsencrypt/live/erp.computingforgeeks.com/fullchain.pem; ssl_certificate_key /etc/letsencrypt/live/erp.computingforgeeks.com/privkey.pem; ssl_trusted_certificate /etc/letsencrypt/live/erp.computingforgeeks.com/chain.pem; # Proxy settings proxy_read_timeout 720s; proxy_connect_timeout 720s; proxy_send_timeout 720s; proxy_set_header X-Forwarded-Host $host; proxy_set_header X-Forwarded-For $proxy_add_x_forwarded_for; proxy_set_header X-Forwarded-Proto $scheme; proxy_set_header X-Real-IP $remote_addr; # Request for root domain location / { proxy_redirect off; proxy_pass http://odooserver; } # Cache static files location ~* /web/static/ { proxy_cache_valid 200 90m; proxy_buffering on; expires 864000; proxy_pass http://odooserver; } # Gzip Compression gzip_types text/css text/less text/plain text/xml application/xml application/json application/javascript; gzip on; } 验证你的Nginx配置: $ sudo nginx -t 返回如下信息代表成功了: nginx: the configuration file /etc/nginx/nginx.conf syntax is ok nginx: configuration file /etc/nginx/nginx.conf test is successful 重新启动Nginx: sudo systemctl restart nginx
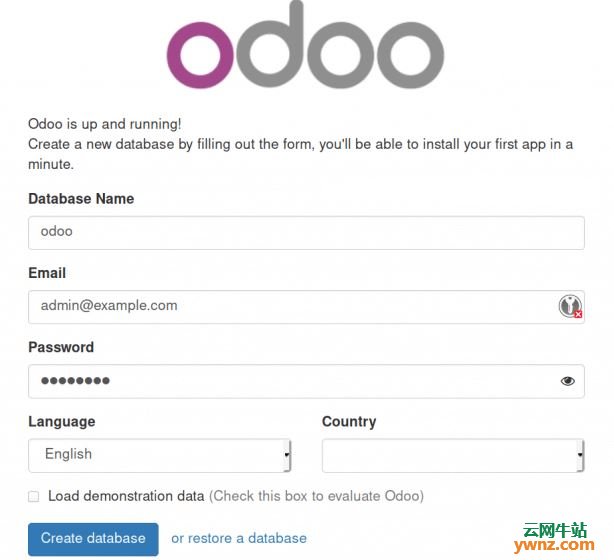
五、访问Odoo 13的方法 从Web上的域名访问Odoo网页,地址是https://DNShostname:
在第一页上,设置数据库名称、管理员用户的电子邮件地址和管理员用户的密码。 使用应用程序菜单安装其他Odoo应用程序:
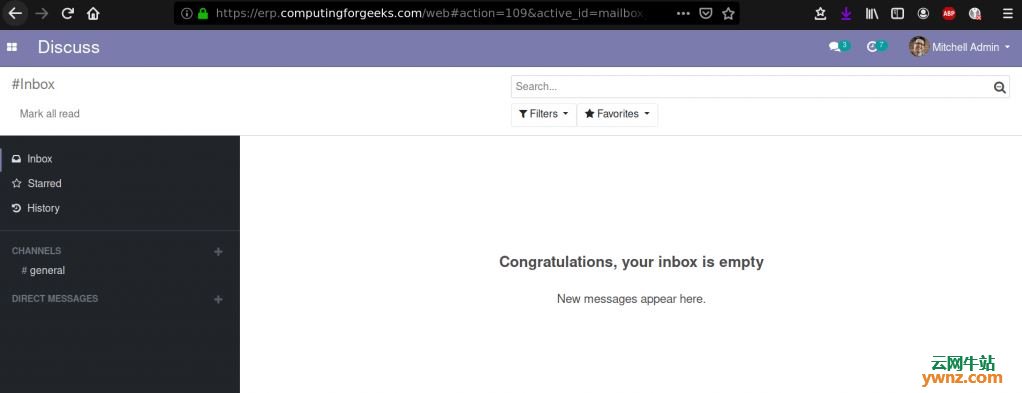
例:
至此,Odoo 13已成功安装在CentOS 7 Linux服务器上。
相关主题 |