|
Chatwoot是用于实时消息传递渠道的客户支持工具,这可以帮助企业通过社交媒体渠道为客户提供良好的客户支持。本文介绍在Ubuntu 20.04上安装自托管的Chatwoot实时聊天服务器,在进行安装之前,请注意的要求有:已升级所有软件包的Ubuntu 20.04 LTS服务器、Nginx服务器安装、用于加密的Certbot、FQDN-完全合格的域名。
一、下载安装脚本 在Ubuntu 20.04终端中,运行以下命令以下载将用于安装chatwoot的脚本: wget https://raw.githubusercontent.com/chatwoot/chatwoot/develop/deployment/setup_20.04.sh -O setup.sh
二、在Ubuntu 20.04上安装Chatwoot 使下载的脚本可执行,并以sudo身份运行: chmod 755 setup.sh sudo ./setup.sh 安装程序将下载并安装Chatwoot所需的软件包。 成功安装后,您将看到以下输出: .... Woot! Woot!! Chatwoot server installation is complete The server will be accessible at http://<server-ip>:3000 To configure a domain and SSL certificate, follow the guide at https://www.chatwoot.com/docs/deployment/deploy-chatwoot-in-linux-vm 可以在以下位置直接访问该服务: http://<server-ip>:3000
三、安装Nginx Web服务器 可以通过http://<server-ip>:3000访问Chatwoot,您应该配置防火墙以允许3000端口。 在此设置中,我们需要安装Nginx并将其用作Chatwoot的反向代理。我们还将在nginx主机上设置SSL加密。 在Ubuntu 20.04上安装Nginx: sudo apt update sudo apt install nginx 参考:在Ubuntu 20.04上安装Nginx和PHP-FPM,及用Nginx配置PHP-FPM。 然后配置nginx,先取消链接默认的nginx配置: sudo unlink /etc/nginx/sites-enabled/default 创建virtualhost: cd /etc/nginx/sites-available sudo nano chatwoot.conf 在conf文件中添加以下配置: server { server_name <yourdomain.com>; # Point upstream to Chatwoot App Server set $upstream 127.0.0.1:3000; # Nginx strips out underscore in headers by default # Chatwoot relies on underscore in headers for API # Make sure that the config is turned on. underscores_in_headers on; location /.well-known { alias /var/www/ssl-proof/chatwoot/.well-known; } location / { proxy_pass_header Authorization; proxy_pass http://$upstream; proxy_set_header Upgrade $http_upgrade; proxy_set_header Connection "upgrade"; proxy_set_header Host $host; proxy_set_header X-Forwarded-Proto $scheme; proxy_set_header X-Forwarded-Ssl on; # Optional proxy_set_header X-Real-IP $remote_addr; proxy_set_header X-Forwarded-For $proxy_add_x_forwarded_for; proxy_http_version 1.1; proxy_set_header Connection “”; proxy_buffering off; client_max_body_size 0; proxy_read_timeout 36000s; proxy_redirect off; } listen 80; } 将配置文件链接到/etc/nginx/sites-enabled: sudo ln -s /etc/nginx/sites-available/chatwoot.conf /etc/nginx/sites-enabled/chatwoot.conf 验证您的Nginx配置是否正常,然后重新启动Nginx服务: $ sudo nginx -t $ sudo systemctl reload nginx
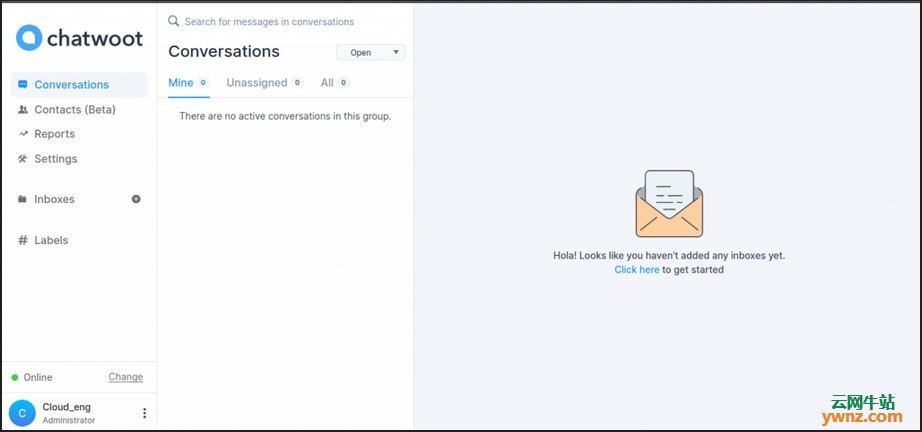
四、配置Let’s Encrypt SSL for Chatwoot 添加certbot存储库: sudo add-apt-repository ppa:certbot/certbot 为Nginx安装certbot: sudo apt update sudo apt install python-certbot-nginx 参考:使用Certbot:在Linux上安装letsencrypt的最简单方法。 运行Let’s Encrypt: sudo mkdir -p /var/www/ssl-proof/chatwoot/.well-known sudo certbot --webroot -w /var/www/ssl-proof/chatwoot/ -d yourdomain.com -i nginx 注:请自行修改yourdomain。您现在可以从https://yourdomain.com访问Chatwoot实时服务器了,如下图:
以下将配置Chatwoot环境。 您需要配置chatwoot环境以具有正常运行的系统。 1.以Chatwoot用户身份登录 # Login as chatwoot user sudo -i -u chatwoot cd chatwoot 2.配置Facebook频道 您需要在他们的开发人员门户中创建一个Facebook应用。 然后,您需要在.env文件中填写以下详细信息: ##edit the .env file nano .env FB_VERIFY_TOKEN= FB_APP_SECRET= FB_APP_ID= 3.配置电子邮件 在.env文件中,在以下字段中添加SMTP详细信息: MAILER_SENDER_EMAIL= SMTP_ADDRESS= SMTP_USERNAME= SMTP_PASSWORD= 4.配置存储 您可以将Chatwoot配置为使用云存储(例如Amazon s3),而不是使用默认本地存储,可以在.env文件的以下字段中进行更改: ACTIVE_STORAGE_SERVICE='local' .env文件中的任何更新/更改后,重新启动chatwoot服务: sudo systemctl restart chatwoot.target
五、升级Chatwoot的方法 使用以下步骤升级到Chatwoot的较新版本。 以Chatwoot用户身份登录: sudo -i -u chatwoot 导航到Chatwoot目录: cd chatwoot 拉最新版本的master分支: git checkout master && git pull 更新依赖: bundle yarn 重新编译assets: rake assets:precompile RAILS_ENV=production 迁移数据库架构: RAILS_ENV=production bundle exec rake db:migrate 重新启动chatwoot服务器: systemctl restart chatwoot.target
相关主题 |