|
如果已经在Linux Apache Web服务器上安装了osTicket,则可以使用SSL/TLS保护应用程序的安全。本文介绍使用免费的Let’s Encrypt SSL证书来保护osTicket访问,将使用Certbot向Let's Encrypt证书颁发机构请求SSL证书,当前该工具默认情况下不可用,需要手动安装。
步骤1:安装certbot证书生成工具 在Ubuntu/Debian上安装certbot: sudo apt update # Apache sudo apt-get install python-certbot-apache # Nginx sudo apt-get install python-certbot-nginx 在CentOS 8/CentOS 7上安装certbot: # CentOS 8 ## For Apache sudo yum -y install python3-certbot-apache ## For Nginx sudo yum -y install python3-certbot-nginx # CentOS 7 ## For Apache sudo yum -y install python2-certbot-apache ## For Nginx sudo yum -y install python2-certbot-nginx
步骤2:更新osTicket Apache配置 安装参考:在CentOS 8 Linux服务器上安装osTicket并配置osTicket的方法。 修改并运行下一个命令,该命令将使用/var/www/osTicket/upload webroot目录获取单个证书: sudo certbot certonly --webroot -w /var/www/osTicket/upload -d osticket.computingforgeeks.com 注: /var/www/osTicket/upload是osTicket webroot。 osticket.computingforgeeks.com是具有有效DNS的域,指向主机服务器的记录。 输入用于紧急更新和安全通知的电子邮件地址: $ sudo certbot certonly --webroot -w /var/www/osTicket/upload -d osticket.computingforgeeks.com Saving debug log to /var/log/letsencrypt/letsencrypt.log Plugins selected: Authenticator webroot, Installer None Enter email address (used for urgent renewal and security notices) (Enter 'c' to cancel): webmaster@computingforgeeks.com 阅读并接受服务条款,如下: Please read the Terms of Service at https://letsencrypt.org/documents/LE-SA-v1.2-November-15-2017.pdf. You must agree in order to register with the ACME server. Do you agree? (Y)es/(N)o: Y (可选)同意与电子前沿基金会共享您的电子邮件地址: Would you be willing, once your first certificate is successfully issued, to share your email address with the Electronic Frontier Foundation, a founding partner of the Let's Encrypt project and the non-profit organization that develops Certbot? We'd like to send you email about our work encrypting the web,EFF news, campaigns, and ways to support digital freedom. (Y)es/(N)o: Y Account registered. 让我们开始加密证书生成过程,如下: Requesting a certificate for osticket.computingforgeeks.com and www.osticket.computingforgeeks.com Performing the following challenges: http-01 challenge for osticket.computingforgeeks.com http-01 challenge for www.osticket.computingforgeeks.com Using the webroot path /var/www/osTicket/upload for all unmatched domains. Waiting for verification... Saving debug log to /var/log/letsencrypt/letsencrypt.log Plugins selected: Authenticator webroot, Installer None Requesting a certificate for osticket.computingforgeeks.com Subscribe to the EFF mailing list (email: webmaster@computingforgeeks.com). 将Web Server osTicket配置文件更新为如下所示。 osTicket的原始Web服务器配置文件: $ cat /etc/httpd/conf.d/osticket.conf <VirtualHost *:80> ServerAdmin webmaster@computingforgeeks.com DocumentRoot /var/www/osTicket/upload ServerName osticket.computingforgeeks.com ServerAlias www.osticket.computingforgeeks.com <Directory /var/www/osTicket/> Options FollowSymlinks AllowOverride All Require all granted </Directory> ErrorLog /var/log/httpd/osticket_error.log CustomLog /var/log/httpd/osticket_access.log combined </VirtualHost> 备份http配置文件: sudo cp /etc/httpd/conf.d/osticket.conf{,.bak} 打开文件进行编辑: sudo vim /etc/httpd/conf.d/osticket.conf 粘贴并修改以下内容以更新配置: # 使用让我们加密SSL的osTicket配置 <VirtualHost *:80> ServerName osticket.computingforgeeks.com RewriteEngine On RewriteCond %{HTTPS} !=on RewriteRule ^/?(.*) https://%{SERVER_NAME}/$1 [R=301,L] </virtualhost> <VirtualHost *:443> ServerAdmin webmaster@computingforgeeks.com DocumentRoot /var/www/osTicket/upload ServerName osticket.computingforgeeks.com <Directory /var/www/osTicket/upload/> Options Indexes FollowSymLinks MultiViews AllowOverride All Order allow,deny allow from all Require all granted </Directory> ErrorLog /var/log/httpd/osticket_error.log CustomLog /var/log/httpd/osticket_access.log combined SSLEngine on SSLCertificateFile /etc/letsencrypt/live/osticket.computingforgeeks.com/fullchain.pem SSLCertificateKeyFile /etc/letsencrypt/live/osticket.computingforgeeks.com/privkey.pem </VirtualHost> 确认配置语法: $ sudo /usr/sbin/httpd -t Syntax OK 重新启动httpd或apache2服务,具体取决于您的操作系统: # Ubuntu/Debian $ sudo a2enmod rewrite expires $ sudo systemctl restart apache2 # CentOS/RHEL $ sudo systemctl restart httpd 服务应返回运行状态,运行systemctl status httpd命令查看是否返回Active: active (running)。 证书续签: $ sudo /usr/bin/certbot renew Saving debug log to /var/log/letsencrypt/letsencrypt.log Processing /etc/letsencrypt/renewal/osticket.computingforgeeks.com.conf 通过cron使用自动续订: # Ubuntu / Debian $ sudo /usr/bin/certbot renew --pre-hook "systemctl stop apache2" --post-hook "systemctl start apache2" # CentOS $ sudo /usr/bin/certbot renew --pre-hook "systemctl stop httpd" --post-hook "systemctl start httpd"
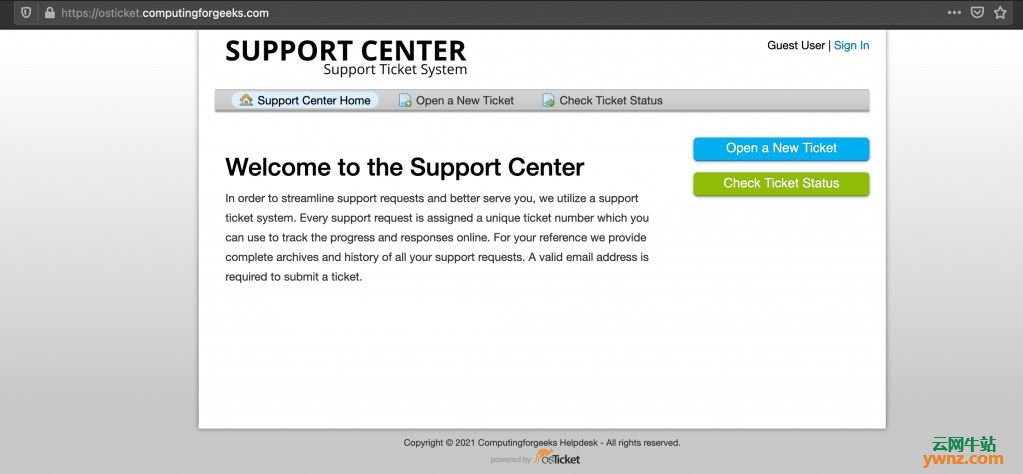
步骤3:访问osTicket Web门户 打开osTicket Web门户以确认网站是否已加载https:
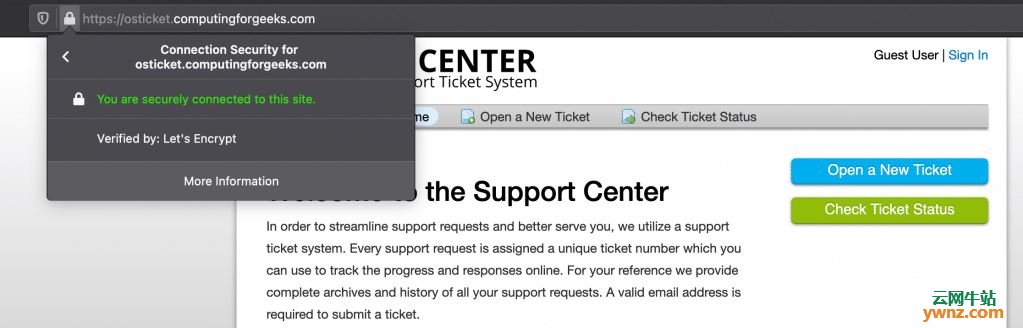
如果单击锁定按钮,它将告诉您与站点的连接是安全的:
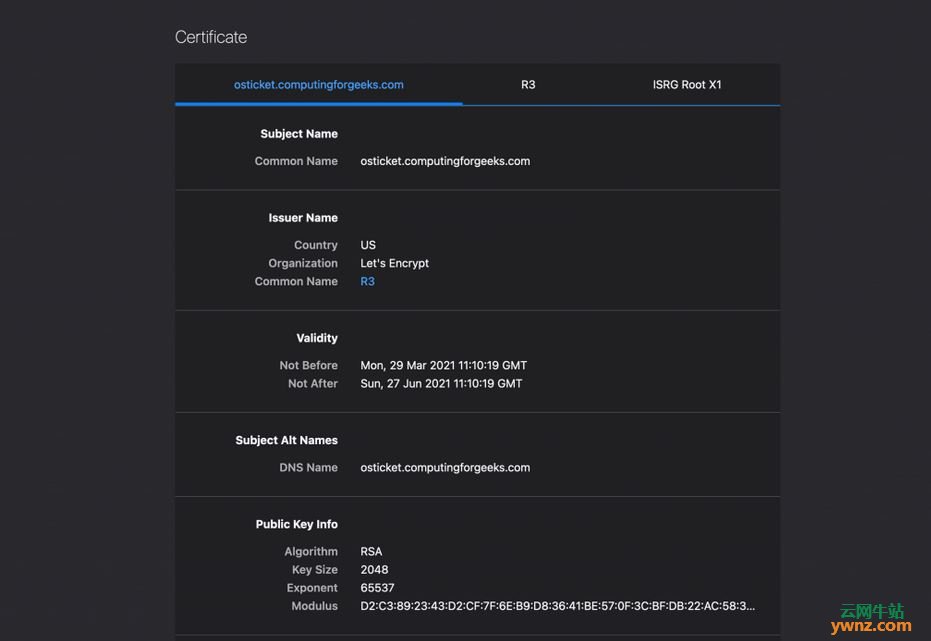
单击更多信息以获取有关证书的更多详细信息:
至此,您的osTicket安装已通过Let's Encrypt SSL证书进行了安全保护。
相关主题 |