|
本文介绍在Ubuntu 18.04/Debian 9操作系统上配置MariaDB Replication(MariaDB主从复制)的方法。MariaDB Replication过程允许你维护MySQL数据的多个副本,主服务器中的所有数据都在自动化过程中同步到Slave服务器,如果遇到灾难可以轻松地将Slave升级为Master以进行提交操作,复制的主要作用是在多个服务器之间传播读写工作负载,以实现轻松的可伸缩性。
一、在Ubuntu 18.04/Debian 9上安装MariaDB参考文章 我有两个节点,用于设置MariaDB主从replication,第一个节点将充当主节点,而第二个节点将成为从节点: 节点1:192.168.18.40 节点2:192.168.18.41 安装MariaDB请参考: 在Ubuntu 18.04系统上安装MariaDB 10.4的步骤 在CentOS 7服务器中安装MariaDB 10.4的方法 1、以下是在Ubuntu 18.04上安装MariaDB 10.3 使用以下命令在Ubuntu 18.04服务器上安装MariaDB 10.3: sudo apt update sudo apt-key adv --recv-keys --keyserver hkp://keyserver.ubuntu.com:80 0xF1656F24C74CD1D8 sudo add-apt-repository 'deb [arch=amd64] http://mirror.zol.co.zw/mariadb/repo/10.3/ubuntu bionic main' sudo apt update sudo apt install mariadb-server mariadb-client 2、在Debian 9上安装MariaDB 10.3 添加MariaDB 10.3存储库并安装mariadb-server软件包: sudo apt-key adv --recv-keys --keyserver keyserver.ubuntu.com 0xF1656F24C74CD1D8 sudo add-apt-repository 'deb [arch=amd64,i386,ppc64el] http://mirror.zol.co.zw/mariadb/repo/10.3/debian stretch main' sudo apt-get update && sudo apt-get install mariadb-server 出现提示时设置root密码: While not mandatory, it is highly recommended that you set a password for the MariaDB administrative "root" user. If this field is left blank, the password will not be changed. New password for the MariaDB "root" user: Repeat password for the MariaDB "root" user:
二、配置MariaDB主服务器 一旦在两台服务器上安装MariaDB,通过ssh登录节点1(主节点)并将侦听地址更改为服务器的实际IP地址,编辑文件/etc/mysql/my.cnf并在mysqld部分下添加以下行: #bind-address = 127.0.0.1 bind-address = 192.168.18.40 设置服务器ID,该ID将是主服务器的唯一标识符: server-id = 100 创建数据库复制用户: $ mysql -u root -p Enter password: Welcome to the MariaDB monitor. Commands end with ; or \g. Your MariaDB connection id is 50 Server version: 10.3.9-MariaDB-1:10.3.9+maria~bionic-log mariadb.org binary distribution MariaDB [(none)]> grant replication slave on *.* to mysql_replica@'%' identified by 'StrongPassword'; Query OK, 0 rows affected (0.001 sec) MariaDB [(none)]> flush privileges; Query OK, 0 rows affected (0.001 sec) MariaDB [(none)]> exit Bye 重新启动MariaDB服务器以使更改生效: sudo systemctl restart mysql 使用ss或netstat命令检查状态: # ss -tunelp | grep 3306 tcp LISTEN 0 70 192.168.18.40:3306 0.0.0.0:* users:(("mysqld",pid=16877,fd=22)) uid:111 ino:48116 sk:4 <-> 如果正在运行防火墙,请打开端口3306: sudo ufw allow 3306 参考:Debian、Ubuntu、Linux Mint系统中的UFW防火墙入门教程。
三、配置MariaDB从属服务器 登录到从属服务器/服务器并配置MariaDB: $ sudo vim /etc/mysql/my.cnf 设置在[mysqld]部分下面值以下: [mysqld] bind-address = 192.168.18.41 server-id = 101 log_bin = /var/log/mysql/mariadb-bin read_only = 1 report-host = mariadb-slave1 expire-logs-days = 7 read_only = 1:这将从设备设置为只读模式,只有具有SUPER权限和复制从属线程的用户才能修改其上的数据,这可确保没有可能意外修改从站而非主站上数据的应用程序。 server-id = 101:这是唯一的服务器标识号,如果未设置“master-host”,它将默认为1。 log_bin = /var/log/mysql/mariadb-bin:这启用了二进制日志记录,这是在复制配置中充当MASTER所必需的,如果需要从最新备份执行时间点恢复,则还需要二进制日志。 更改后重新启动mariadb: sudo systemctl restart mysql
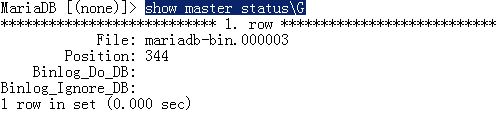
四、初始化Replication过程 我们应该准备好在从属服务器上启动Replication过程,首先检查主服务器上的状态: MariaDB [(none)]> show master status\G
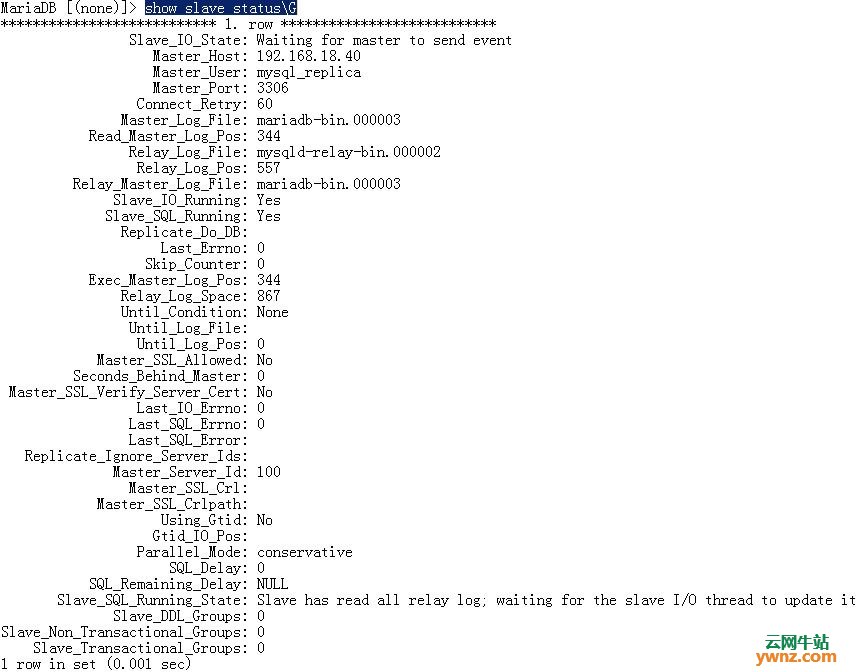
记下当前的主日志文件和位置,然后使用从主状态命令获取的详细信息配置从服务器。 以root用户身份登录MariaDB Slave服务器并配置与主服务器的连接: $ mysql -u root -p CHANGE MASTER TO MASTER_HOST='192.168.18.40', MASTER_USER='mysql_replica', MASTER_PASSWORD='StrongPassword', MASTER_LOG_FILE='mariadb-bin.000003', MASTER_LOG_POS=344; 然后在slave上启动复制: mysql> start slave; Query OK, 0 rows affected (0.002 sec) 要检查从站状态,请使用: MariaDB [(none)]> show slave status\G
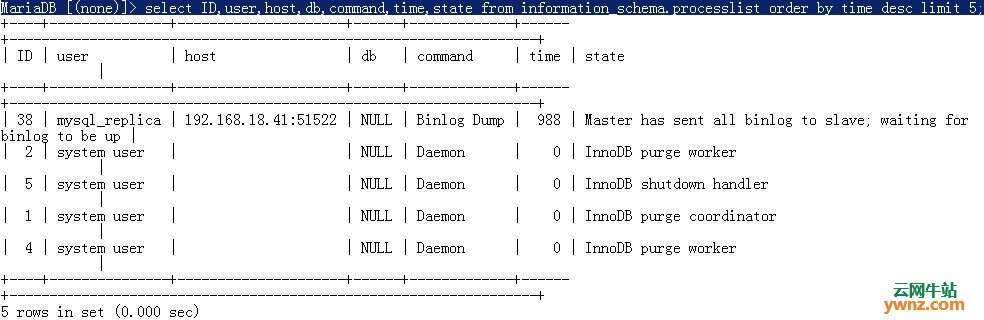
Slave IO和SQL应指示运行状态: Slave_IO_Running: Yes Slave_SQL_Running: Yes 检查主服务器上的进程列表还应显示从服务器的连接: MariaDB [(none)]> select ID,user,host,db,command,time,state from information_schema.processlist order by time desc limit 5;
至此,全过程完成。
相关主题 |